- Aug 15, 2023
- 9 min
Creating dynamic personalized experiences: Integrating Magnolia with a CDP
Magnolia in action
Take 12 minutes and a coffee break to discover how Magnolia can elevate your digital experience.
In today’s multichannel environments, brands need to be able to unify their entire customer journey and provide relevant experiences for each customer, at every touchpoint.
Magnolia enables marketers to create variants of content and define which audiences will see each content variant, all in a visual, WYSIWYG environment. To help brands unify their customer data on every channel and touchpoint, Magnolia integrates with Customer Data Platform (CDP) technology.
In this article, we will take a look at how Magnolia can be integrated with a CDP to support personalization.
Magnolia offers personalization tools out-of-the-box. User requests are examined for hints known as traits and content is prepared and served to an audience that shares particular traits. This might be users who have viewed a particular page or who have put a certain product in their shopping basket. As a content management system / digital experience platform Magnolia’s role is to collect that content from editors and serve it to the right audience. What Magnolia does not do, however, is apply traits to users.
For an overview of Magnolia’s personalization tools, you can watch the video below, where I demonstrate how to personalize a simple page using three different traits and then preview it as different types of user to experience the site as real users would.

For the above examples, one can write JavaScript to recognize particular events and act upon them but a dedicated customer data platform can receive a stream of every user activity and identify traits over time. A CDP can also receive input from outside of the website environment. Email interaction, for example, can be tracked, as can order activity in a commercial environment. This allows for very rich profiles to be built over time, and, of course, richer profiles can lead to more accurate personalization.
For this walk through of an integration project, we will use Magnolia in a headless setup to manage a single page app. The integration approach discussed will be fairly generic but we will use Segment as our CDP when we need to discuss specifics.
The integration will take place via three steps. First, we will enable a data stream to send data from the frontend of our website to the CDP. Then we will set up the CDP to interpret this stream and supply data to Magnolia, and finally, we will configure Magnolia to recognize this data and act upon it.
Step One - The data stream
.png)
Before we can begin to analyse any data, we must collect it. A CDP will most likely offer a simple integration using pre-written JavaScript. This could then be integrated using a tag manager or incorporated into your own source. Segment offers this kind of pre-built library.
With the JavaScript integrated, Segment will generate a random user ID for every site visitor and store this in a cookie. When the user does something we consider note-worthy, we can send details of the event along with this user ID and begin building a profile. For an ecommerce demo project we maintain, we arranged for events to be fired when a user viewed a category page or a product page. The Track API from Segment accepts post requests that contain properties such as those shown below.
 "anonymousId":"9977ced9…",
   "event":"Category Viewed",
   "properties":{
      "category_id":"dba8b1e4…",
      "category_key":"GDN",
      "category_name":"Garden"
   },

   "anonymousId":"9977ced9…",
   "event":"Product Viewed",
   "properties":{
      "product_id":"03ef411e…",
      "product_name":"Otteroen sweater”
   },
Because Magnolia offers complete control of the frontend and out-of-the-box support for many popular JS single page app frameworks, you can add whatever events you desire. Interactions with image galleries, price calculators, shopping baskets and anything else in your pages can all be reported back to your CDP.
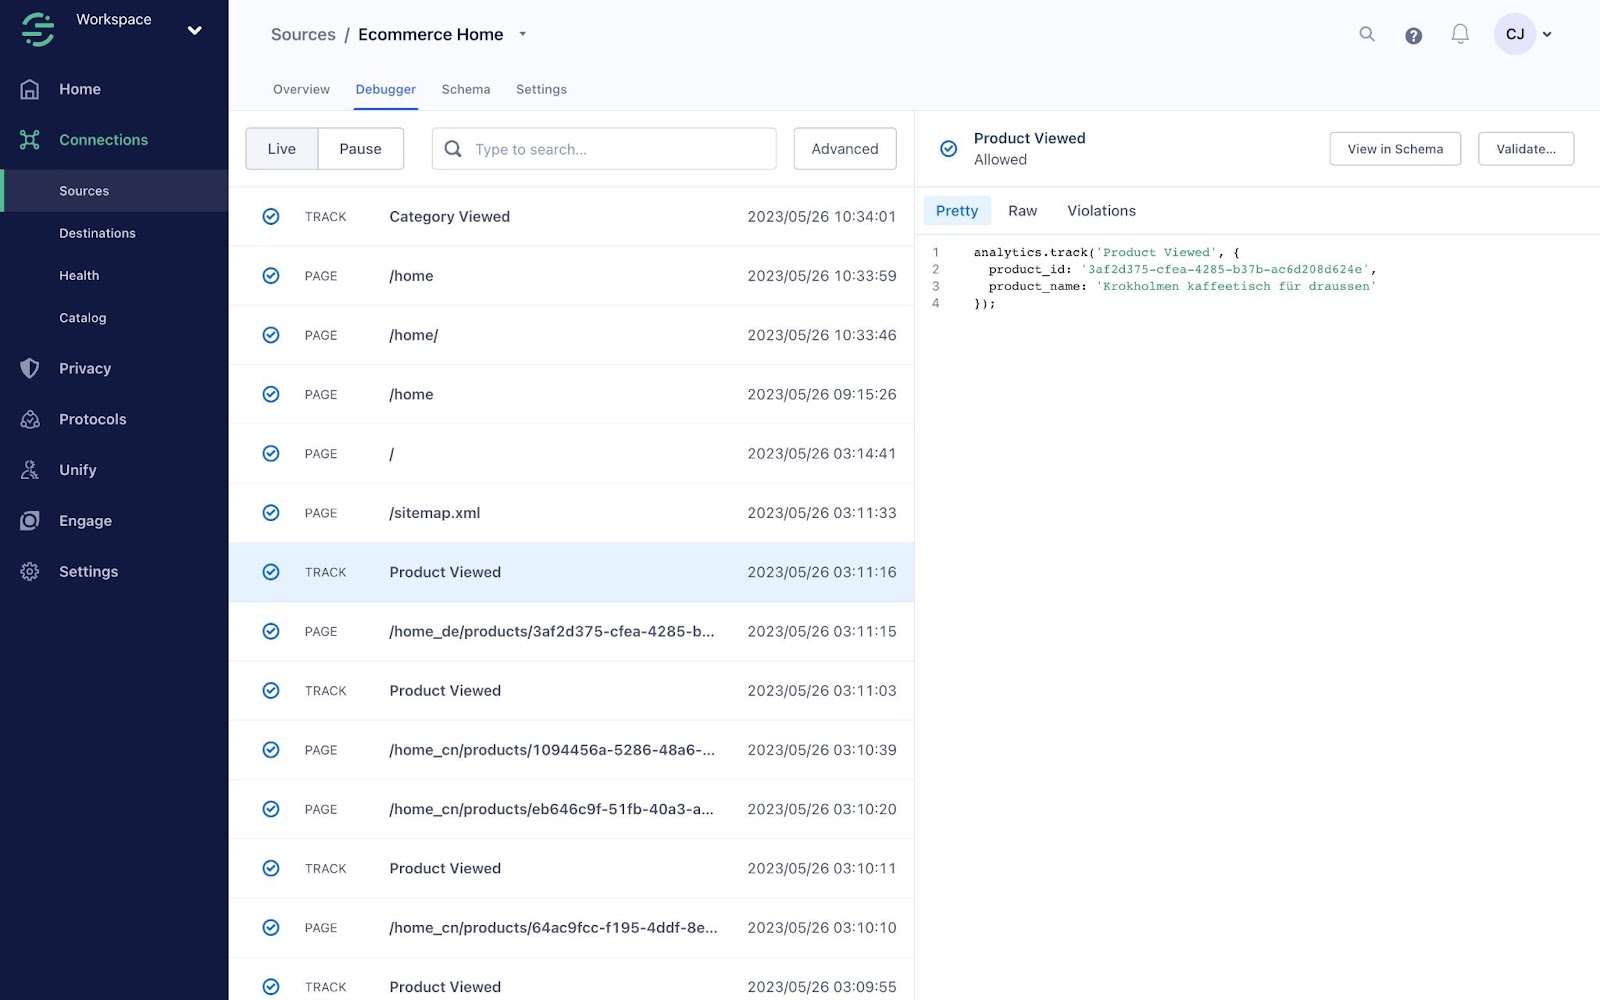
Next up, we may need to configure our CDP to recognize this source of data. In Segment, we add a new “JavaScript Source” and configure it as required. Once configured, we can start sending events and use the debugger view to ensure they are being received as expected.

Now that our website is sending data and our CDP is receiving it, we can start to use it.
Step Two - Making sense of the stream
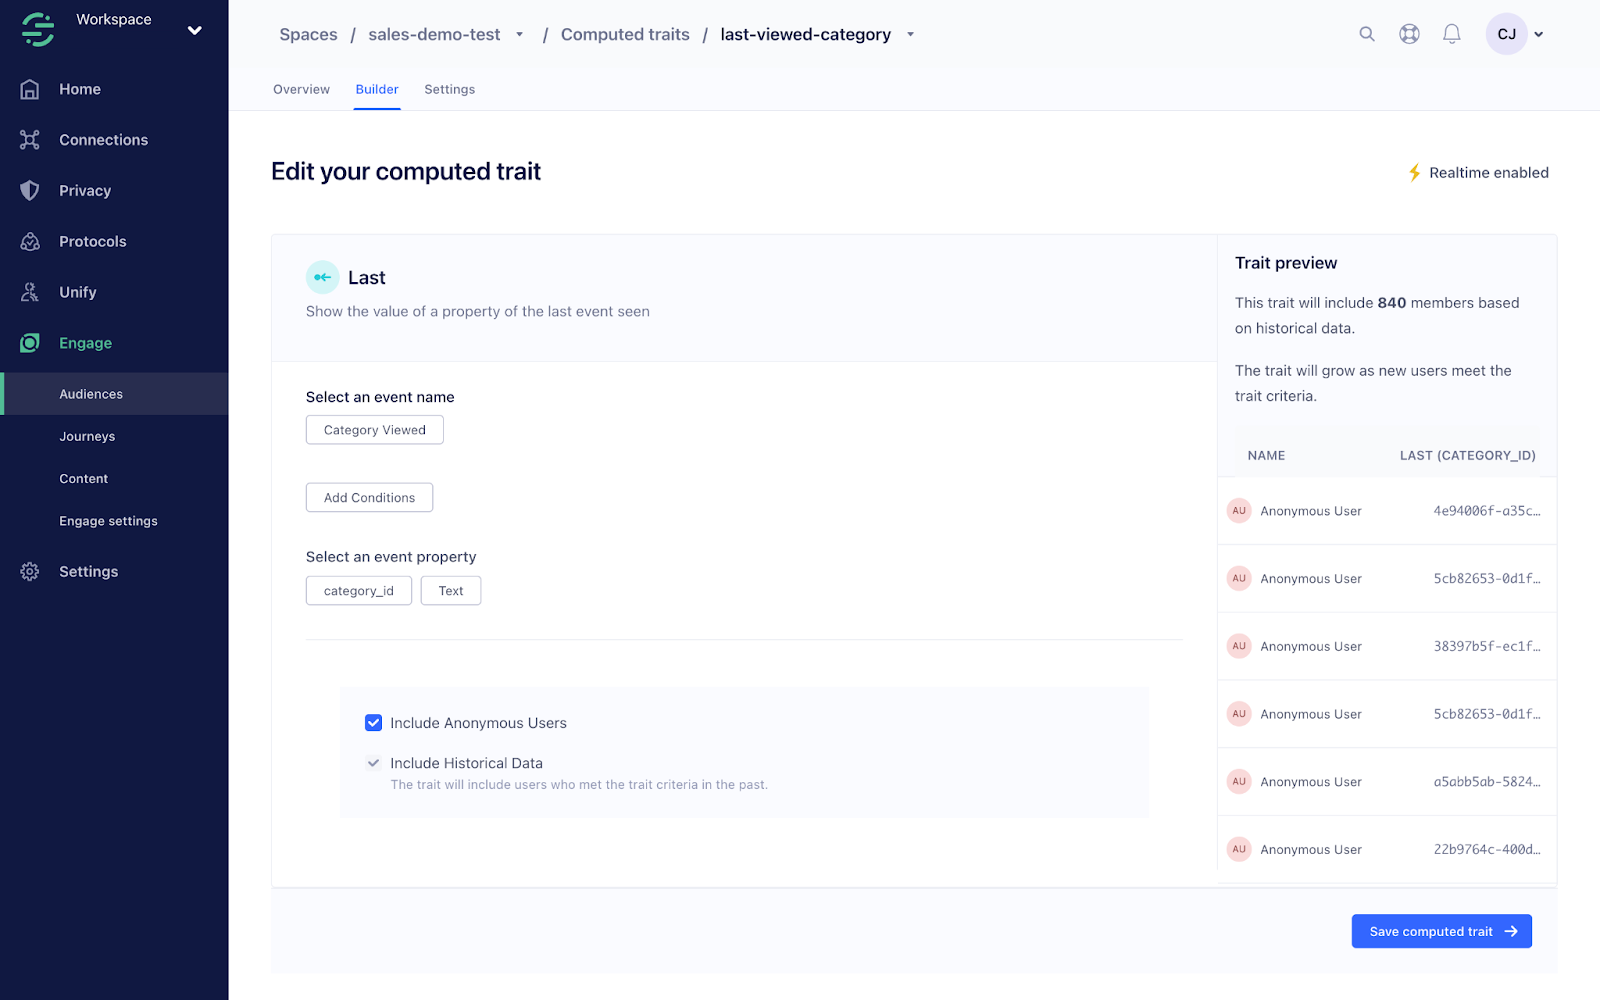
With the CDP receiving a stream of data, we need to decide what we actually want to act upon. Configuring any particular CDP to identify patterns is outside the scope of this article so we will look at a very simple use case: identifying the last category a user browsed.
Segment offers us a range of computed traits including the ability to track the last value submitted for a repeated event, ie. the last category ID received when a given user looked at a category landing page. We will configure this in the Segment UI which then makes it available via REST request.

With a trait configured, we can look at the output of the CDP’s API: for this Segment use case we can hit the Profiles API. This API allows us to pass the generated customer ID and receive a list of the computed traits.
.png)
For this example, we call the API using an HTTP get request
In response we receive a JSON object detailing the customer’s traits.
{
  "traits": {
    "last_viewed_category": "4d7a73d2-f3bd-475b-9dbe-74888a265d69",
  },
  "cursor": {
    "url": "",
    "has_more": false,
    "next": "",
    "limit": 10
  }
}
This is very useful, but the Segment API expects us to authenticate using our API token before we make this request. We all know that including an API token in publicly accessible JavaScript is a bad idea, but how else could we make this request from a frontend application? The answer is to configure a proxy endpoint in Magnolia using the REST Proxy module. Magnolia exposes a new endpoint that will accept requests and then send them to the CDP before passing back the response. A key additional feature of the Magnolia REST Proxy module is the ability to augment that request by adding authentication details, ie. The frontend makes an anonymous/unauthenticated request to the endpoint exposed by Magnolia, and Magnolia makes the same request to the CPD complete with authentication credentials before passing the response back to the frontend.
Segment Product Brief
Use Segment to get a 360-degree view of your customers and leverage those insights in Magnolia to create the right content, for the right audience, at the right time.
To configure such an endpoint for this example, we first use the configuration shown below to create a REST client inside a Magnolia light module. The strings shown in all capitals are placeholders for replacement with variables during our deployment process. For more information, see Gitlab CI Variables.
baseUrl: https://profiles.segment.com/v1/spaces/SEGMENT_SPACE_ID/collections/users/profiles/
cacheConfiguration:
  expireIn: 60
timeoutConfiguration:
  readTimeout: 5
  fallbackToCache: true
securitySchemes:
  b1:
    $type: basic
    username: SEGMENT_ACCESS_TOKEN
    password: ''
restCalls:
  traits:
    method: get
    path: /{id}/traits
    securityScheme: b1
Then we add a proxy endpoint configuration as shown below to receive requests.
class: info.magnolia.services.demos.rest.service.ConfiguredRestProxyEndpointDefinition
restClientName: segment
restCallName: traits
Now we have a simple route for our frontend to request information about a user as well as reporting on how that user interacts with our website. The final step is to pull it all together.
Step Three - Using the data
Now that we have a route for the frontend of our website to obtain user traits, we need to send those traits to Magnolia and ensure Magnolia can act upon them.
First, we must ensure that the frontend provides the category information to Magnolia when it calls the Delivery API. This is done at the point where we call the API to fetch page content. This will vary per project, but in our example project we do the following.
// Read the anonymous user ID from cookies
const cookieValue = document.cookie.replace(/(?:(?:^|.*;\s*)ajs_anonymous_id\s*=\s*([^;]*).*$)|^.*$/, '$1');

// Fetch the associated traits via the exposed Magnolia endpoint
const traitsResponse = await get('/.rest/traits', {
  method: 'POST',
  headers: { 'Content-Type': 'application/json' },
  body: `{"id":"anonymous_id:${cookieValue}"}`,
});
const lastViewedCategory = traitsResponse?.traits?.last_viewed_category;

// Where we have a value for the last viewed category, add it to the request we are sending to fetch the page content
if (lastViewedCategory) params += '&segmentLastViewedCategory=' + lastViewedCategory;
This means the request for the page content will be tailored according to the last category viewed, and the content returned can be tailored to match. We have added the category ID to the request parameters, so the response can be cached without any further work.
Next, we can configure a personalization trait using a YAML file. This file will provide a list of expected trait values which are then offered to an editor to match content to an audience. Currently, these values must be configured as a static list, so we must provide the expected category IDs that could be returned by the traits API along with labels to present to the editor. Here is an example from our demonstration project:
name: segmentLastViewedCategory
$type: requestParameterTrait
ruleField:
  $type: comboBoxField
  name: value
  datasource: &datasource
    $type: optionListDatasource
    options:
      - name: Bathroom
        value: 30e3595e-0973-4873-960b-30e3595ee813
      - name: Garden
        value: dba8b1e4-69bb-4e6b-a0ce-dba8b1e43ca0
      - name: Dining
        value: a58bee9e-f41b-47b6-b05a-a58bee9ed09b
valueField:
  $type: comboBoxField
  datasource: *datasource
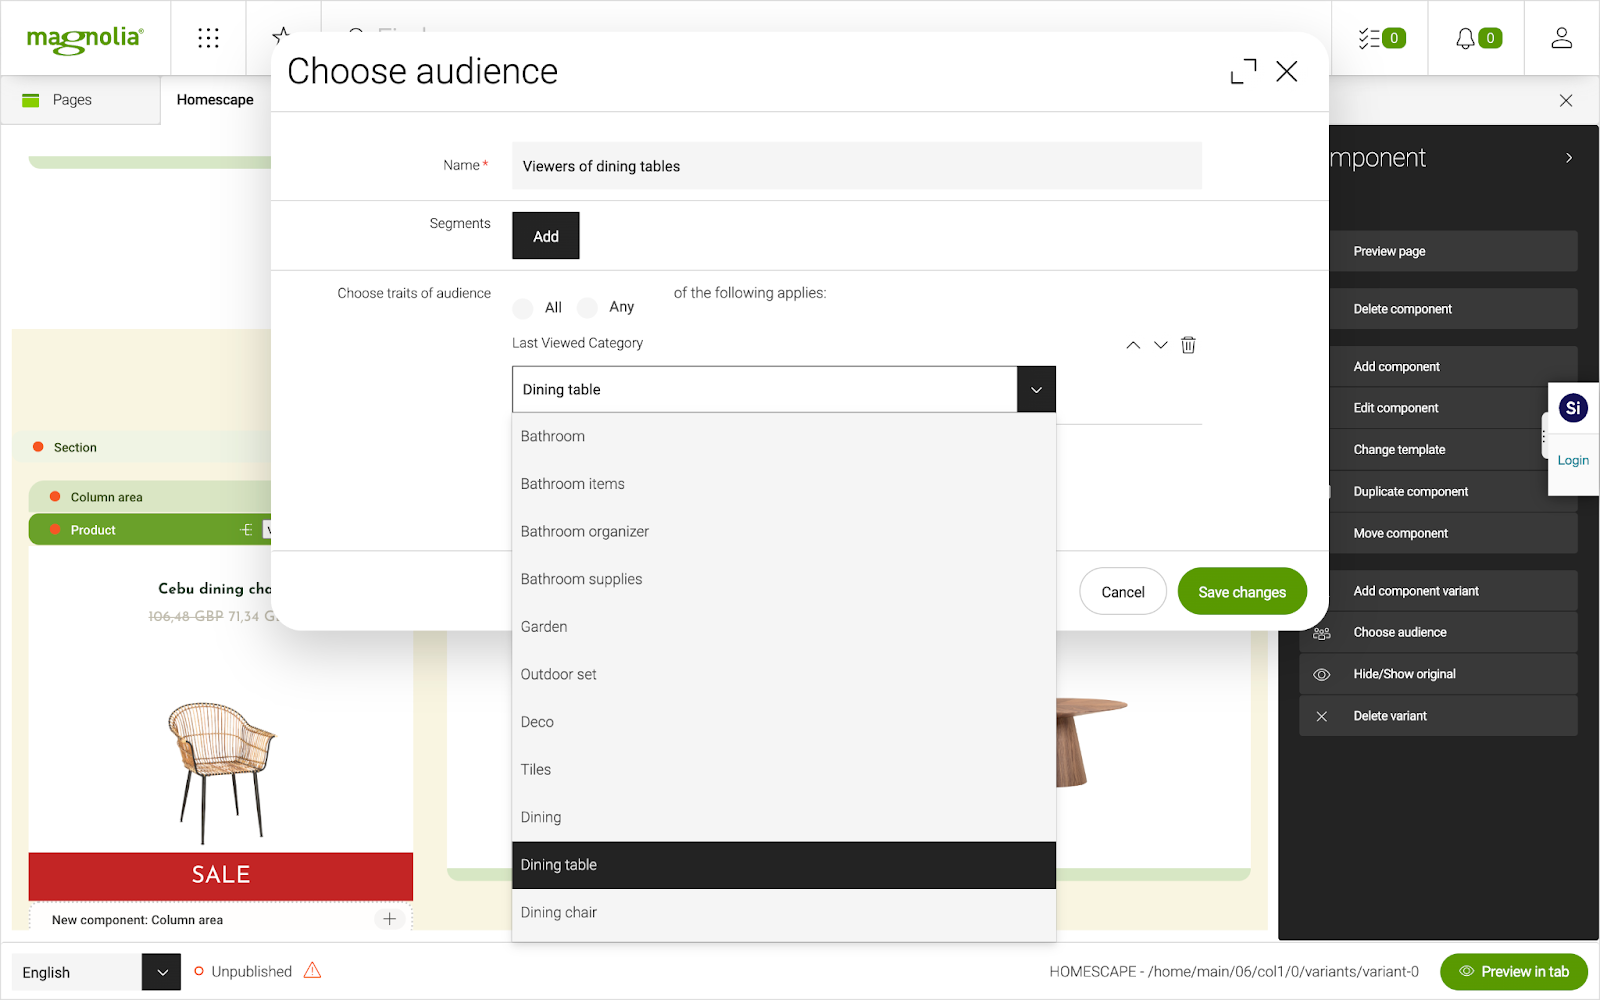
Configuring the trait makes it available to editors when they assign an audience to a variant. They can now create page or component variants using the standard Magnolia tools and assign a variant to people who last viewed a given category. Alternatively, the trait can be used in audience segmentation to bundle traits together.

This final piece of Magnolia configuration means we now have the ability to serve targeted content to users depending on which category they last viewed. In our homewares example, we could display a selection of dining tables to those who last looked at dining room furniture and towels to those who last viewed bathroom items. In a travel setting, we could display imagery taken from the last region of the world a customer viewed, and a fashion retailer could display menswear or womenswear depending on where the customer last looked.
.png)
Conclusion
This blog shows the simple steps for integration of CDP with Magnolia’s personalization tools. Extending the configuration of the CDP offers the opportunity to create any number of traits and to serve content to any number of user groups.
Good luck with your own integrations and please get in touch if you would like to share any interesting code you create along the way.
If you’d like to get the Segment integration we have developed, check it out on our Marketplace.


