- Jun 14, 2022
- 6 min
Previewing Structured Content From Content Apps
-
 Tobias KerschbaumSolution Architect, Magnolia

Magnolia in action
Take 12 minutes and a coffee break to discover how Magnolia can elevate your digital experience.
Magnolia's headless CMS lets you manage content in a central hub and then use it on multiple touchpoints. Marketers and content authors can manage structured content using a Content app. Content apps make it easy to enter content such as products or events via a form.
The centralized management of content has several practical advantages. For example, changes only need to be made in one place to update the content in every frontend automatically. In addition, rights can be configured so that different departments have their own areas within the same content management system.
While Magnolia offers a visual editor to create and design pages, Content apps don’t offer a preview out of the box. A preview, however, can be very useful to check if the created content will look as desired, for example, a title wraps correctly, or an image looks right.
In this blog article, I would like to show how to create a preview for Content apps easily. You can rebuild this functionality in your environment by copying my code examples.
You need a web app, an additional Maven module, and a Magnolia Light Module:
blog-preview-webapp
blog-preview-config
blog-preview-light
Creating the Events Content App
First, we create a Content Type and Content app for events using Magnolia Light Development, our low-code approach. If you are new to Content Types and apps in Magnolia, I recommend reading the Content Types tutorial.
Creating the Content Type Model Definition
We create a very simple events content type definition following the Content Type documentation.
File: blog-preview-light/contentTypes/events.yaml
1datasource:
2 workspace: events
3 autoCreate: true
4model:
5 nodeType: event
6 properties:
7   - name: name
8     label: Event name
9     required: true
10     i18n: true
11   - name: location
12     label: Location
13     i18n: true
14   - name: startDate
15     label: Start date
16     type: Date
17   - name: endDate
18     label: End date
19     type: Date
20   - name: abstract
21     label: Abstract
22     i18n: true
23   - name: description
24     label: Description
25     type: richText
26     i18n: true
Creating the Events Content App
Compatible with Magnolia 6.2.38 or newer
For the Events app, we use the previously defined Content Type. Let’s keep the app simple for now: point it to the events content type and assign it a name and a label.
File path: blog-preview-light/apps/events-app.yaml
1!content-type:events
2name: events-app
3label: Events
We will extend the definition later.
Creating the Events Preview Page Template
To preview content outside of a web application, we need a page template for its presentation. We can use this page template for the preview only, or we can use the page template of the actual web app.
Since we haven’t created any page templates yet, we need to create a new template for the preview now.
Creating the Event Page Template Definition
First, we create a simple page definition without defining a user dialog for now.
File: blog-preview-light/templates/pages/event.yaml
1title: Event
2templateScript: /blog-preview-light/templates/pages/event.ftl
3renderType: freemarker
Writing the Event Page Template Script
The second step is to create a simple template script that displays all event properties.
File: blog-preview-light/templates/pages/event.ftl
1<!DOCTYPE html>
2<html>
3 <head>
4   [@cms.page /]
5   <meta charset="utf-8" />
6   <meta name="viewport" content="width=device-width, initial-scale=1, shrink-to-fit=no" />
7   <style>
8       .container {/* Insert your Container style*/}
9       .element {/* Insert your Element style*/}
10   </style>
11 </head>
12 <body>
13   <!-- ${cmsfn.dump(content, 5, true)} uncomment to see all the properties -->
14   <div class="container">
15       <div class="element">Name: ${content.name}</div>
16       <div class="element">Location: ${content.location}</div>
17       <div class="element">StartDate: ${content.startDate}</div>
18       <div class="element">EndDate: ${content.endDate}</div>
19       <div class="element">Abstract: ${content.abstract}</div>
20       <div class="element">Description: ${cmsfn.decode(content).description!""}</div>
21   </div>
22 </body>
23</html>
Updating the Maven Module Configuration
To use the same logic in the preview that will be used in the web app, we need to make two changes in the Maven module.
Updating Module.xml
We make the first change in module.xml by adding the new components using the following id pattern in the component definition: app-<app name>-<subapp name>.
File: blog-preview-config/src/main/resources/META-INF/magnolia/blog-preview-config.xml
1<components>
2 <id>app-events-app-preview</id>
3
4 <component>
5   <type>info.magnolia.pages.app.detail.PageEditorStatus</type>
6   <implementation>info.magnolia.pages.app.detail.PageEditorStatus</implementation>
7   <scope>singleton</scope>
8 </component>
9 <component>
10   <type>info.magnolia.ui.framework.ContentClipboard</type>
11   <implementation>info.magnolia.pages.app.detail.action.clipboard.ComponentContentClipboard</implementation>
12   <scope>singleton</scope>
13 </component>
14 <component>
15   <type>info.magnolia.ui.vaadin.editor.PageEditorView</type>
16   <implementation>info.magnolia.ui.vaadin.editor.PageEditorViewImpl</implementation>
17 </component>
18
19 <component>
20   <type>info.magnolia.ui.observation.DatasourceObservation$Manual</type>
21   <implementation>info.magnolia.pages.app.PagesManualDatasourceObservation</implementation>
22 </component>
23
24</components>
Bootstrapping URI2RepositoryMapping
We make the second change by adding the URI2RepositoryMapping. To activate the change when starting the environment we use the bootstrap mechanism of the Maven module.
File: blog-preview-config/src/main/resources/mgnl-bootstrap/blog-preview-config/config.server.URI2RepositoryMapping.mappings.event.yaml
1'event':
2 'URIPrefix': '/events-app'
3 'handlePrefix': ''
4 'repository': 'events'
Creating the Preview Subapp for Events
Now that all necessary parts are in place, we can create the actual preview subapp for the events app. The following code changes are particularly interesting:
Action:
We define an action that calls our preview subapp defined below.
Action bar:
In the Action bar, we activate the previously defined ShowPreview action.
Detail subapp:
In the details subapp, we add a hidden property 'mgnl:template' with the default value 'blog-preview-light:pages/event' for each newly created event. This is the magic that allows us to use the rendering engine of the web application.
Preview subapp:
In the preview subapp, we define the ‘extensionViews’ from the Magnolia Pages app as well as some actions in the action bar. The 'extensionViews' are responsible for displaying, for example, the language changer in the lower area of the preview.
File: blog-preview-light/templates/pages/event.yaml
1!content-type:events
2name: events-app
3label: Events
4subApps:
5 browser:
6   actions:
7     showPreview:
8       $type: openDetailSubappAction
9       label: Show preview
10       icon: icon-view
11       viewType: view
12       appName: events-app
13       subAppName: preview
14       availability:
15         writePermissionRequired: true
16         nodeTypes:
17           event: event
18   actionbar:
19     sections:
20       item:
21         groups:
22           addActions:
23             items:
24               showPreview: {}
25 detail:
26   label: Event
27   form:
28     properties:
29       mgnl:template:
30         $type: hiddenField
31         defaultValue: 'blog-preview-light:pages/event'
32 preview:
33   class: info.magnolia.pages.app.detail.PageDetailDescriptor
34   extensionViews:
35     title:
36       class: info.magnolia.pages.app.detail.extension.PageTitleViewDefinition
37     status:
38       class: info.magnolia.pages.app.detail.extension.PublishingStatusViewDefinition
39     link:
40       class: info.magnolia.pages.app.detail.extension.NativePagePreviewLinkViewDefinition
41     language:
42       class: info.magnolia.pages.app.detail.extension.LanguageSelectorViewDefinition
43   itemProvider:
44     $type: jcrNodeFromLocationProvider
45   actions:
46     activate:
47       $type: jcrCommandAction
48       icon: icon-publish
49       catalog: default
50       command: publish
51       params:
52         recursive: true
53       availability:
54         writePermissionRequired: true
55         rules:
56           isPublishable: &isPublishable
57             $type: jcrPublishableRule
58     deactivate:
59       $type: jcrCommandAction
60       icon: icon-unpublish
61       catalog: default
62       command: unpublish
63       availability:
64         writePermissionRequired: true
65         rules:
66           isPublishable: *isPublishable
67           notDeleted:
68             $type: jcrIsDeletedRule
69             negate: true
70           isPublished:
71             $type: jcrPublishedRule
72   actionbar:
73     sections:
74       previewActions:
75         label: Preview actions
76         groups:
77           publish:
78             items:
79               - name: activate
80               - name: deactivate
81         availability:
82           rules:
83             inPreview:
84               class: info.magnolia.pages.app.detail.action.availability.IsPreviewRuleDefinition
Congratulations! If you now start your server and open the Events app, you can preview your events.

You might notice, though, that the preview tab does not display the name of the event node. Let’s see how we can fix this.
Displaying the Node Name in the Preview
To show the node name in the preview tab, we have to leave the world of Light Development and do a little Java customization. This change is necessary because the default behaviour of title generation does not work for Content Types.
Creating a Custom DetailDescriptor
First, we create a DetailDescriptor to make our subapp known.
File: blog-preview-config/src/main/java/info/magnolia/blog/preview/preview/NodePreviewDetailDescriptor.java
1package info.magnolia.blog.preview.preview;
2
3import info.magnolia.pages.app.detail.PageDetailDescriptor;
4
5public class NodePreviewDetailDescriptor extends PageDetailDescriptor {
6
7   public NodePreviewDetailDescriptor() {
8       setSubAppClass(NodePreviewDetailSubApp.class);
9   }
10}
Creating a Custom DetailSubApp
In the DetailSubApp we override the getCaption method to create the node title in a preview tab.
File: blog-preview-config/src/main/java/info/magnolia/blog/preview/preview/NodePreviewDetailSubApp.java
1package info.magnolia.blog.preview.preview;
2
3import info.magnolia.pages.app.detail.PageDetailDescriptor;
4import info.magnolia.pages.app.detail.PageDetailSubApp;
5import info.magnolia.pages.app.detail.PageEditorStatus;
6import info.magnolia.pages.app.detail.context.MoveComponentContext;
7import info.magnolia.ui.api.app.SubAppContext;
8import info.magnolia.ui.contentapp.detail.ContentDetailSubApp;
9import info.magnolia.ui.vaadin.editor.PageEditorView;
10
11import javax.inject.Inject;
12
13public class NodePreviewDetailSubApp extends PageDetailSubApp {
14
15   private final PageEditorStatus pageEditorStatus;
16
17   @Inject
18   public NodePreviewDetailSubApp(SubAppContext subAppContext, PageDetailDescriptor subAppDescriptor, ContentDetailSubApp.LocationContext locationContext, MoveComponentContext moveComponentContext, PageEditorStatus pageEditorStatus, PageEditorView pageEditorView) {
19       super(subAppContext, subAppDescriptor, locationContext, moveComponentContext, pageEditorStatus, pageEditorView);
20       this.pageEditorStatus = pageEditorStatus;
21   }
22
23   @Override
24   public String getCaption() {
25       return pageEditorStatus.getNodePath().substring(pageEditorStatus.getNodePath().lastIndexOf('/') + 1).trim();
26   }
27}
Updating the Preview Subapp Class
Finally, we change the events app’s definition. Instead of using the default class info.magnolia.pages.app.detail.PageDetailDescriptor we define the new class info.magnolia.blog.preview.preview.NodePreviewDetailDescriptor in line 33.
File: blog-preview-light/templates/pages/event.yaml
1subApps:
2 [...]
3 preview:
4 class: info.magnolia.blog.preview.preview.NodePreviewDetailDescriptor
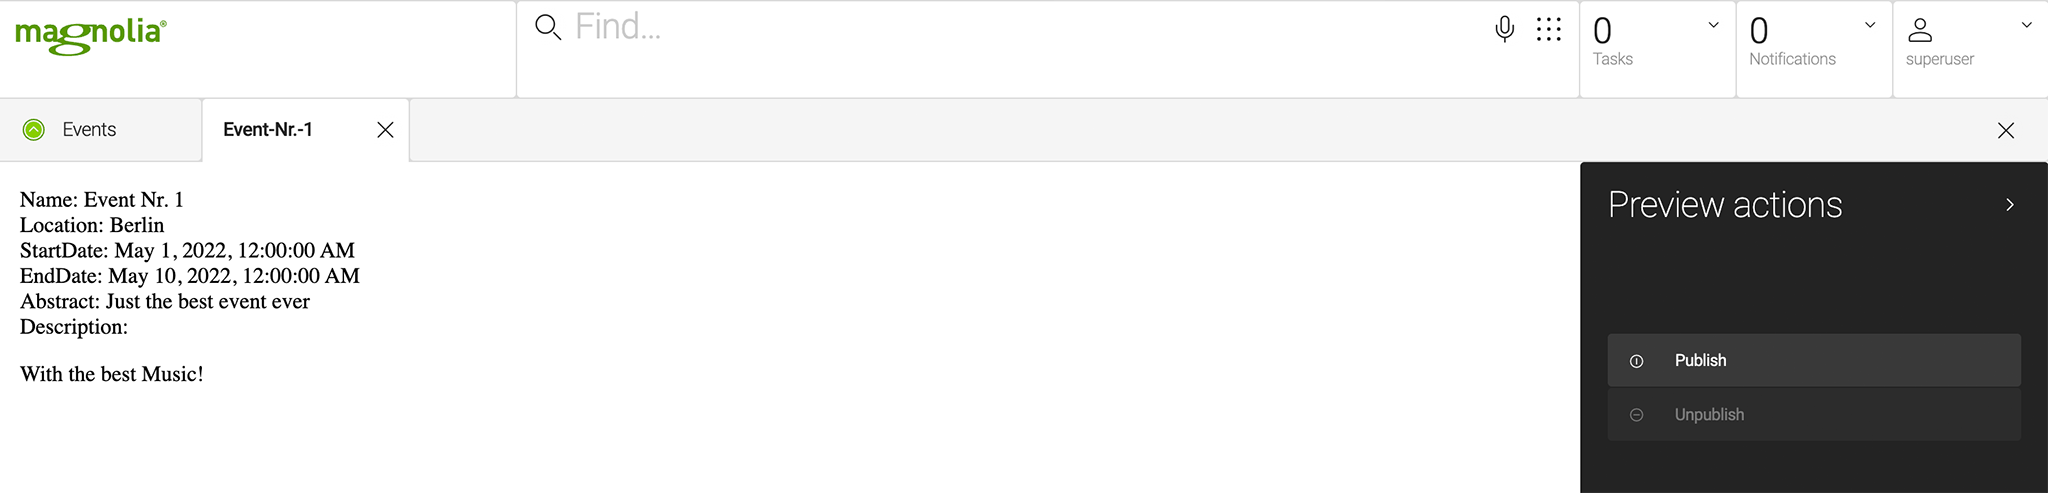
5 [...] This is what the preview tab now looks like:
Creating a Preview for Content App is Easy and Helps Authors
With relatively simple means, it is possible to preview any content quickly. A preview for Content apps can really improve the editorial experience. Authors can check how their content will look in just one click, saving time and nerves.