- Feb 9, 2021
- 10 min
Building a Continuous Delivery Pipeline with GitHub and Helm to deploy Magnolia to Kubernetes
-
 Khiem Do HoangSenior Site Reliability Engineer, Magnolia

Magnolia in action
Take 12 minutes and a coffee break to discover how Magnolia can elevate your digital experience.
Containerizing an application and deploying it to Kubernetes via a continuous delivery (CD) pipeline simplifies its maintenance and makes updates faster and easier.
This article will guide you through the steps to containerize Magnolia using Docker (dockerizing) and set up a complete CD pipeline to a Kubernetes (K8s) cluster.
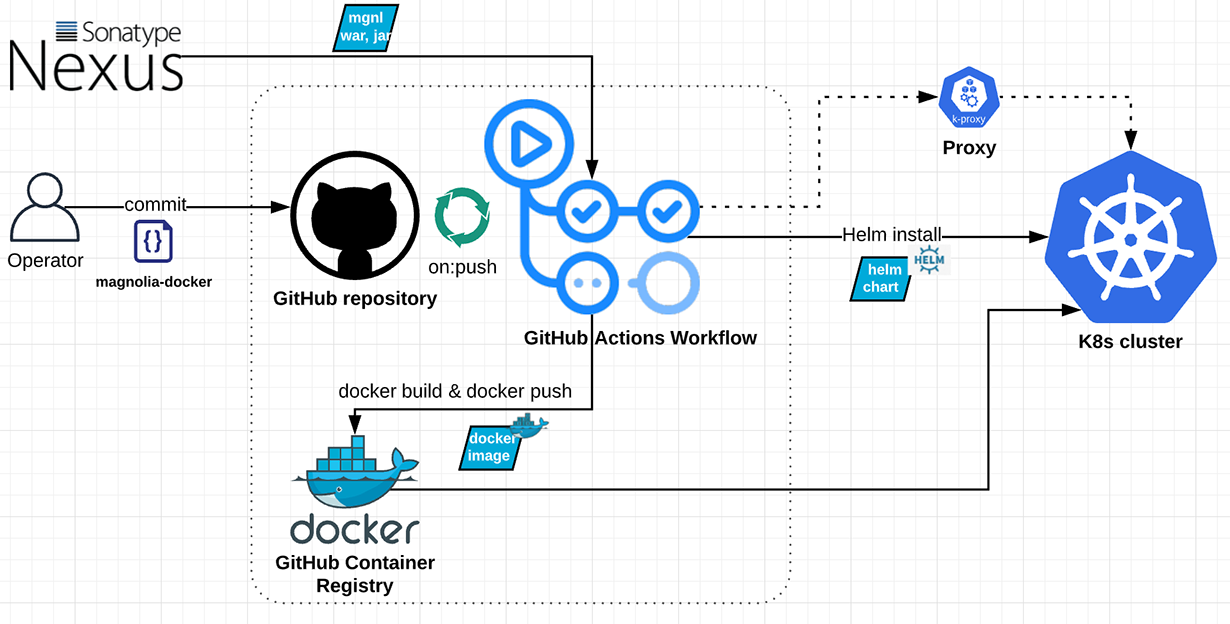
The pipeline will create a Magnolia bundle, build a Docker image, push it to the GitHub Container Registry, and deploy Helm Chart with the Docker image in Kubernetes. As a result, we will be running a containerized Magnolia release in a local Kubernetes cluster.
Key components
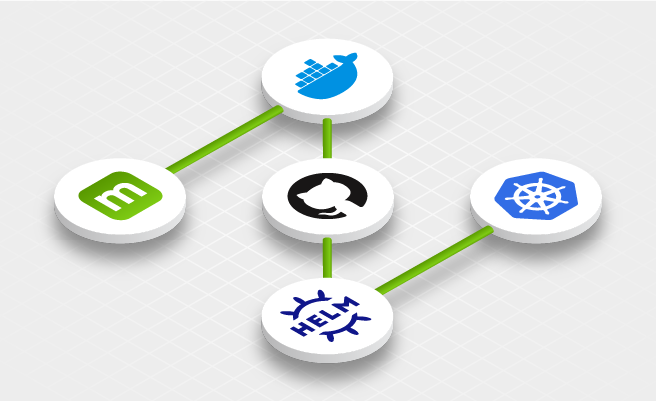
Below is a high-level flow chart of the CD pipeline containing the key components:
Kubernetes
Kubernetes (K8s) is an open-source container orchestration system that enables you to automate containerized application deployment, scaling, and management. It provides a common framework that enables you to run distributed systems, giving development teams consistent, unyielding infrastructure from development to production.
Helm Chart
Helm is a package manager for Kubernetes. It uses a packaging format called charts. Helm charts define, install and upgrade Kubernetes applications.
GitHub Actions
By automating your software development workflows, GitHub Actions allows you to easily set up continuous integration (CI) and continuous deployment (CD) directly in your repository–without the help of other CI/CD systems.
A workflow is an automated process that you set up in your GitHub repository. You can build, test, package, release, or deploy any GitHub project using a workflow. It consists of different tasks, called actions, that can be run automatically on certain events, for example, a pull request merge or a git push.
GitHub Container Registry
GitHub Container Registry enables you to host and manage Docker container images in your organization or a personal user account on GitHub. You can also configure who can manage and access packages using fine-grained permissions.
Prerequisites
To build the pipeline, we’ll install several command-line interface (CLI) tools, set up a local Kubernetes cluster and a GitHub Repository hosting our deployment files and pipeline.
minikube
minikube enables you to run a single-node Kubernetes cluster on a virtual machine (VM) on your personal computer. You can use it to try Kubernetes or for your daily development work.
If you already have a Kubernetes cluster that you can use, for example, AWS EKS or Google GKE, you can skip this step. Otherwise, please install minikube by following its documentation.
With minikube installed on your machine, you can start the cluster using a specific Kubernetes version:
1
2$ minikube start --kubernetes-version=1.16.0
3😄  minikube v1.6.2 on Darwin 10.14.5
4✨  Automatically selected the 'virtualbox' driver (alternates: [])
5🔥  Creating virtualbox VM (CPUs=2, Memory=2000MB, Disk=20000MB) ...
6🐳  Preparing Kubernetes v1.16.0 on Docker '19.03.5' ...
7💾  Downloading kubeadm v1.16.0
8💾  Downloading kubelet v1.16.0
9🚜  Pulling images ...
10🚀  Launching Kubernetes ...
11⌛  Waiting for cluster to come online ...
12🏄  Done! kubectl is now configured to use "minikube"
kubectl
kubectl is a Kubernetes command-line tool to run commands against a Kubernetes cluster. It can be used to deploy applications, inspect and manage cluster resources, and view logs.
Install kubectl and verify your minikube cluster:
1$ kubectl get pods -n kube-system
2NAME                               READY   STATUS    RESTARTS   AGE
3coredns-5644d7b6d9-nq48z           1/1     Running   1          3h27m
4coredns-5644d7b6d9-sqgrb           1/1     Running   1          3h27m
5etcd-minikube                      1/1     Running   1          3h26m
6kube-addon-manager-minikube        1/1     Running   1          3h26m
7kube-apiserver-minikube            1/1     Running   1          3h26m
8kube-controller-manager-minikube   1/1     Running   2          3h26m
9kube-proxy-zw787                   1/1     Running   1          3h27m
10kube-scheduler-minikube            1/1     Running   2          3h26m
11storage-provisioner                1/1     Running   1          3h27m
As our Kubernetes cluster is running inside a VM, we’ll also use kubectl proxy to proxy from your localhost address to the Kubernetes API server inside your VM.
1$ kubectl proxy --port=8080 --accept-hosts='.*\.ngrok.io
2$' &
3[1] 30147
4$ Starting to serve on 127.0.0.1:8080
ngrok
As we will later access the Kubernetes cluster from GitHub Actions, we’ll need a public proxy that routes requests to your Kubernetes API server. You can use ngrok, a free tunneling system, to expose your local services externally.
It only takes a few minutes to register for an account and set up a tunnel to localhost. To connect your local services with ngrok please follow the documentation.
1$ ngrok http http://127.0.0.1:8080
2
3ngrok by @inconshreveable                                                                                                                                         (Ctrl+C to quit)
4
5Session Status                online
6Account                       Do Hoang Khiem (Plan: Free)
7Version                       2.3.35
8Region                        United States (us)
9Web Interface                 http://127.0.0.1:4040
10Forwarding                    http://66ab386be8b6.ngrok.io -> http://127.0.0.1:8080
11Forwarding                    https://66ab386be8b6.ngrok.io -> http://127.0.0.1:8080
1Connections                   ttl     opn     rt1     rt5     p50     p90
2                              295     0       0.00    0.00    8.84    46.03
Helm
Helm is an essential tool for working with Kubernetes. It isn’t needed to complete this deployment, but it’s still good to have on your local machine to verify and validate your deployment in the end.
You can install the Helm 3 package manager by following the documentation.
Check the Helm version after installation.
1$ helm version
2version.BuildInfo{Version:"v3.2.4", GitCommit:"0ad800ef43d3b826f31a5ad8dfbb4fe05d143688", GitTreeState:"dirty", GoVersion:"go1.14.3"}
GitHub Repository
You will need to set up a GitHub Repository, GitHub Container Registry and Personal Access Token.
1. Fork magnolia-sre/magnolia-docker

2. Enable the GitHub Container Registry
To use the GitHub Container Registry you have to enable improved container support. Navigate to “Feature preview” in the top-right menu underneath your account profile, then enable improved container support.

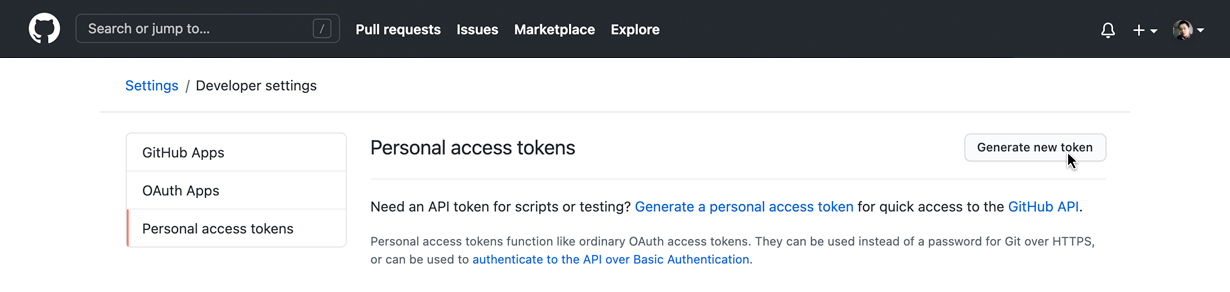
3. Generate a GitHub personal access token
We have to use a GitHub Personal Access Token for pushing Docker images to the GitHub Container Registry. You can generate a new token via Settings → Developer settings → Personal access tokens. Click on “Generate new token”:
On the next screen, select at least the write:packages and delete:packages scopes:
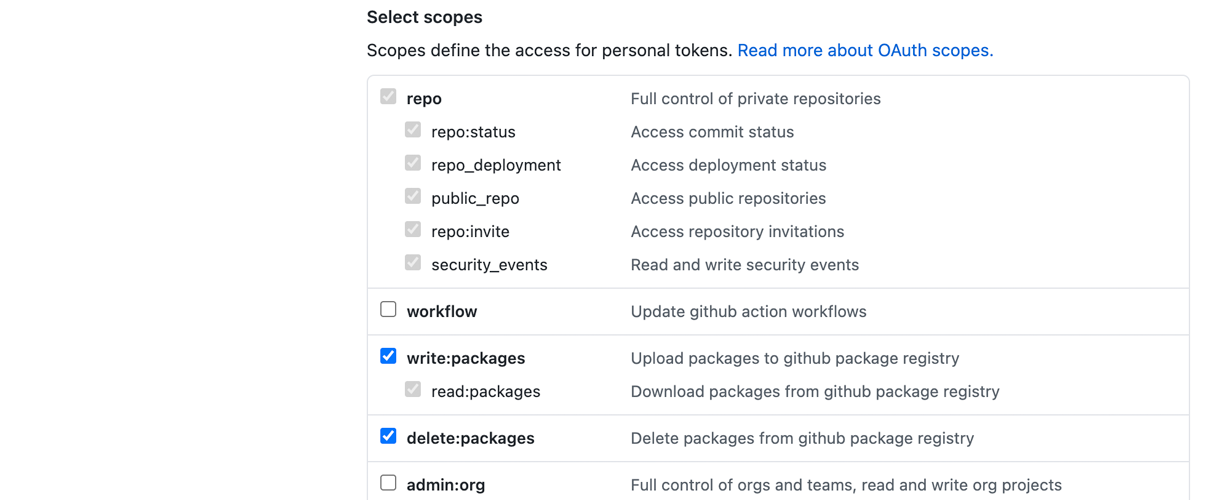
Once created, copy the token, as it won’t be visible again.
4. Configure Secrets in your magnolia-docker repository
Go back to your repository and configure your Secrets under Settings → Secrets:
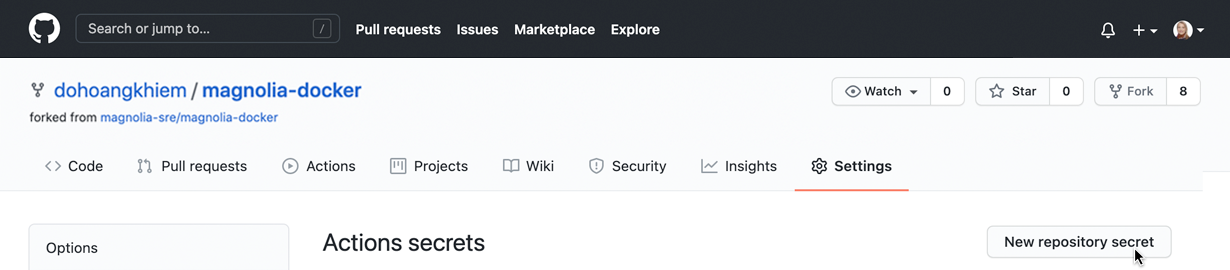
Create a Secret for each of the following key-value pairs:
PACKAGE_USER: Your GitHub username
PACKAGE_TOKEN: Your personal access token
KUBECONFIG: Your Kubernetes configuration for accessing your cluster
If you’re accessing the cluster from your local machine you can find the config file at ~/.kube/config, or you can use kubectl config view to view the current config.
If you see an attribute such as certificate-authority, client-certificate, or client-key in the config file which specifies a path to a .crt or .key file, you have to replace it with certificate-authority-data, client-certificate-data, client-key-data respectively, and replace the file path with the base64-encoded value of the .crt or .key content.
For example, to get the base64-encoded value of certificate-authority-data:
cat ~/.minikube/ca.crt | base64
Below is an example of KUBECONFIG (cert and key base64 are truncated). The ngrok endpoint is used for the cluster parameter.
For this demonstration, we can use insecure-skip-tls-verify:true to ignore untrusted certificates:
1apiVersion: v1
2clusters:
3- cluster:
4   server: https://66ab386be8b6.ngrok.io
5   insecure-skip-tls-verify: true
6 name: minikube
7contexts:
8- context:
9   cluster: minikube
10   user: minikube
11 name: minikube
12current-context: minikube
13kind: Config
14preferences: {}
15users:
16- name: minikube
17 user:
18   client-certificate-data: LS0tLS1CRUdJTi...
19 client-key-data: LS0tLS1CRUdJ... 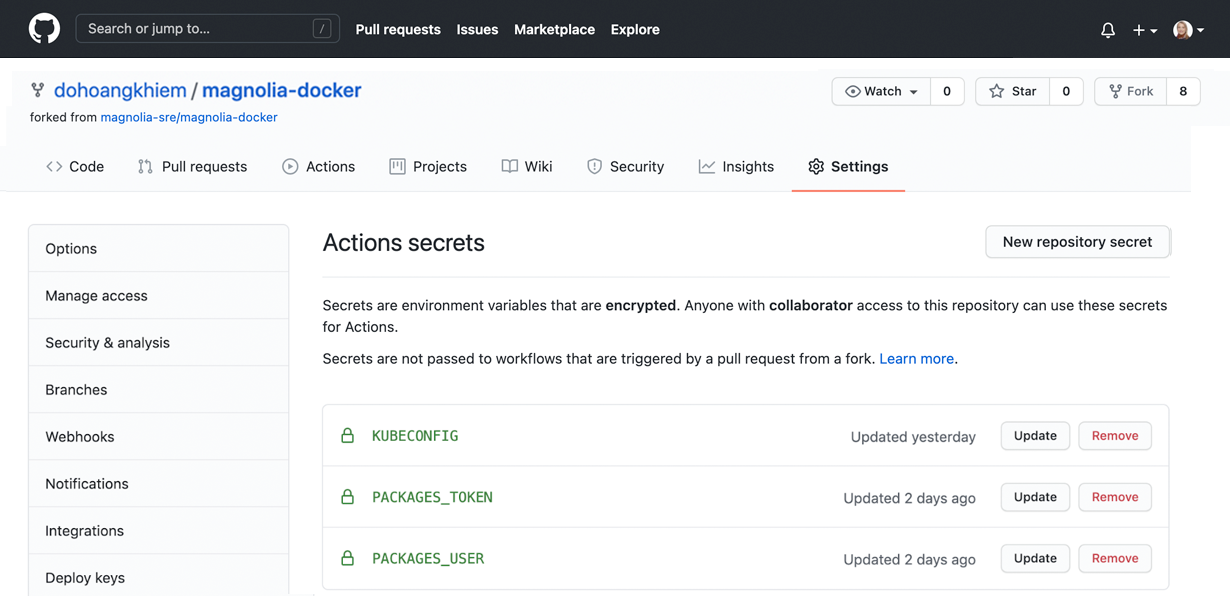
Magnolia in a Can: Containerization with Magnolia
Learn how to deploy Magnolia as a Docker container based on best practices from our professional services team
Magnolia-Docker Image
In this example we use the magnolia-empty-webapp bundle from the Magnolia public releases on Nexus, along with the magnolia-rest-services module for liveness and readiness endpoints. Create the following POM in the webapp directory:
1<project xmlns="http://maven.apache.org/POM/4.0.0" xmlns:xsi="http://www.w3.org/2001/XMLSchema-instance" xsi:schemaLocation="http://maven.apache.org/POM/4.0.0 http://maven.apache.org/maven-v4_0_0.xsd">
2 <modelVersion>4.0.0</modelVersion>
3 <parent>
4   <groupId>info.magnolia.sre</groupId>
5   <artifactId>magnolia-docker-bundle-parent</artifactId>
6   <version>1.0-SNAPSHOT</version>
7   <relativePath>../pom.xml</relativePath>
8 </parent>
9
10 <artifactId>magnolia-docker-bundle-webapp</artifactId>
11 <name>Magnolia Docker Image Bundle Webapp</name>
12 <packaging>war</packaging>
13
14 <dependencies>
15   <dependency>
16     <groupId>info.magnolia</groupId>
17     <artifactId>magnolia-empty-webapp</artifactId>
18     <type>war</type>
19   </dependency>
20   <dependency>
21     <groupId>info.magnolia</groupId>
22     <artifactId>magnolia-empty-webapp</artifactId>
23     <type>pom</type>
24   </dependency>
25
26   <!-- Contains the liveness/readiness end point: .rest/status -->
27   <dependency>
28     <groupId>info.magnolia.rest</groupId>
29     <artifactId>magnolia-rest-services</artifactId>
30   </dependency>
31 </dependencies>
32
33 <build>
34   <finalName>ROOT</finalName>
35
36   <plugins>
37     <plugin>
38       <groupId>io.fabric8</groupId>
39       <artifactId>docker-maven-plugin</artifactId>
40       <configuration>
41         <skip>true</skip>
42       </configuration>
43     </plugin>
44   </plugins>
45 </build>
46</project>
You can test building a Magnolia bundle locally by running this command from the root directory:
$ mvn package -B -U
The bundle will then be used to build a Docker image based on the Tomcat 9 with OpenJDK 11 slim image. This is the Dockerfile which is located under src/main/docker:
1# ----------------------------------------------------------
2# Magnolia Docker Image
3# ----------------------------------------------------------
4#
5
6FROM tomcat:9.0.38-jdk11-openjdk-slim
7
8MAINTAINER sre@magnolia-cms.com
9
10ENV JAVA_OPTS="-Dmagnolia.home=/opt/magnolia -Dmagnolia.resources.dir=/opt/magnolia -Dmagnolia.update.auto=true -Dmagnolia.author.key.location=/opt/magnolia/activation-key/magnolia-activation-keypair.properties"
11
12# Copy Tomcat setenv.sh
13COPY src/main/docker/tomcat-setenv.sh $CATALINA_HOME/bin/setenv.sh
14RUN chmod +x $CATALINA_HOME/bin/setenv.sh
15
16# This directory is used for Magnolia property "magnolia.home"
17RUN mkdir /opt/magnolia
18RUN chmod 755 /opt/magnolia
19
20RUN rm -rf $CATALINA_HOME/webapps/ROOT
21COPY webapp/target/ROOT.war $CATALINA_HOME/webapps/
You can test building a Docker image locally from the root directory of the project:
$ mvn -B docker:build
Magnolia Helm Chart
Magnolia Helm Chart is located in the helm-chart directory. Below is the structure of the chart:
1.
2├── Chart.yaml
3├── templates
4│   ├── configmap.yaml
5│   ├── _helpers.tpl
6│   ├── ingress.yaml
7│   ├── service.yaml
8│   ├── statefulset.yaml
9│   └── tests
10│       └── test-connection.yaml
11└── values.yaml
12
132 directories, 8 files
Chart.yaml
This file defines chart parameters like name, description, type, version, and appVersion.
values.yaml
The file supplies the values to substitute in templates. We can define the image, tag, pullPolicy, service ports, ingress hostnames, resources limits, and custom app configurations like JAVA_OPTS.
templates/statefulset.yaml
This file defines the workload for the application. For this deployment, we use 2 StatefulSets, representing Magnolia author and public. StatefulSet allows us to assign persistent names–sticky identities–and maintain pods in a specific order. In the pod spec of StatefulSet we define containers, volumes, and probes.
template/service.yaml
This file defines the Services for the Magnolia author and public instances, providing load balancing and access to applications in underlying pods.
Execute GitHub Actions Workflow
Workflow Configuration
The GitHub Actions workflow is defined in .github/workflows/pipeline.yml. When triggered, GitHub Actions will automatically look for .yml or .yaml files in the .github/workflows directory.
1name: Build and Publish
2
3on:
4 push:
5   branches: [ master ]
6
7jobs:
8 build:
9   name: 'Maven: Build and upload artifact'
10   runs-on: ubuntu-latest
11
12   steps:
13     - uses: actions/checkout@v2
14     - name: Set up JDK 11
15       uses: actions/setup-java@v1
16       with:
17         java-version: 11
18     - name: Build Magnolia bundle
19       run: mvn package -B -U
20
21     - name: Build Magnolia Docker Image
22       run: mvn -B -Dgithub-registry=${{github.repository_owner}} docker:build
23
24     - name: Push Magnolia Docker Image
25       run: mvn -B -Ddocker.username=${{secrets.PACKAGES_USER}} -Ddocker.password=${{secrets.PACKAGES_TOKEN}} -Dgithub-registry=${{github.repository_owner}} docker:push
26
27
28 helm-lint:
29   name: Helm lint and release
30   runs-on: ubuntu-latest
31   needs: build
32
33   steps:
34     - uses: actions/checkout@v2
35     - name: Helm Lint
36       uses: WyriHaximus/github-action-helm3@v2
37       with:
38         exec: helm lint ./helm-chart
39     - name: Helm install
40       uses: WyriHaximus/github-action-helm3@v2
41       with:
42         exec: helm upgrade --install github-magnolia-docker ./helm-chart
43         kubeconfig: '${{ secrets.KUBECONFIG }}'
At the top of the file, we define the event that triggers the workflow, for example, a push event to the master branch.
The file then configures 2 jobs that are executed on a GitHub-hosted runner, a pre-configured virtual environment, using the latest Ubuntu release “ubuntu-latest”.
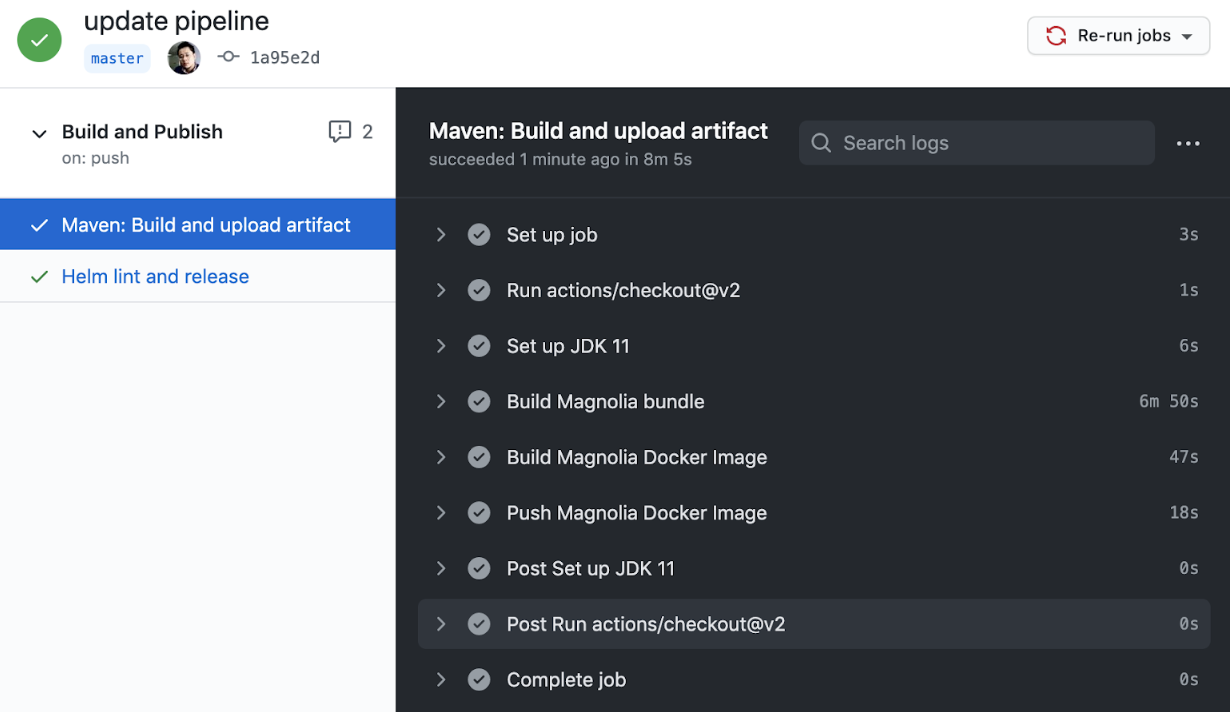
1. Maven: Build and upload artifacts
This job checks out the git repository to the runner, installs JDK 11, and builds the Magnolia bundle and Docker image. Finally, it pushes the image to the GitHub Container Registry.
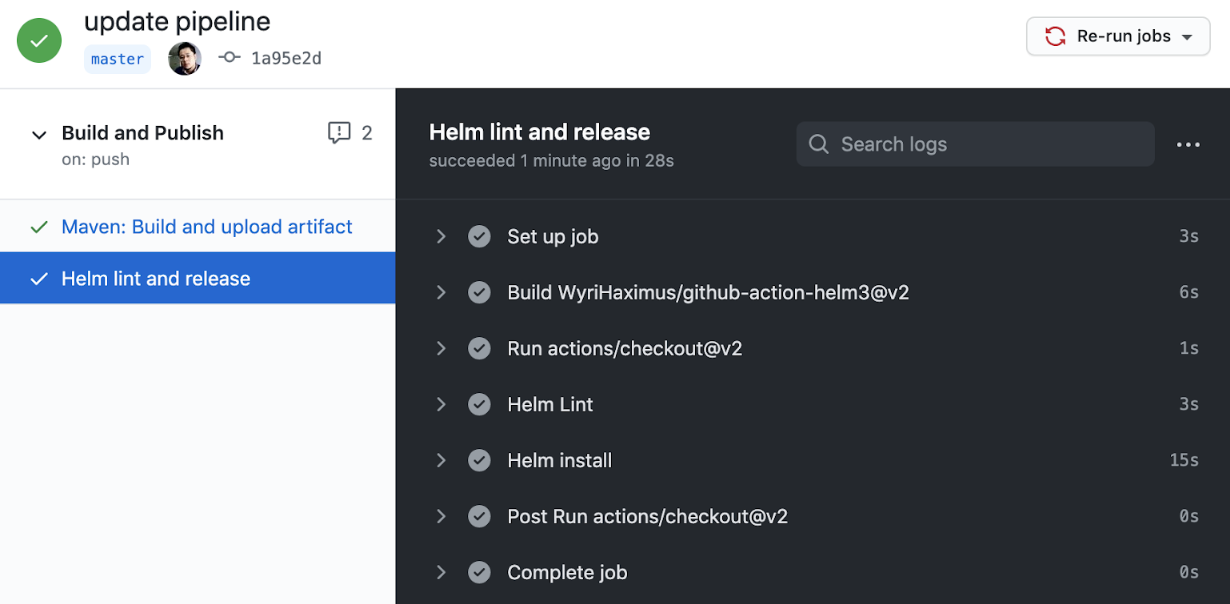
2. Helm lint and release
This job executes helm lint to verify that the chart is well-formed, then installs the chart via Helm.
Trigger Workflow
The workflow is triggered by pushing a change to the master branch of the repository:
Verify Deployment
Now that the pipeline deployment is finished successfully, you can use Helm to verify the release in Kubernetes.
1$ helm list
2NAME                      NAMESPACE    REVISION    UPDATED                                    STATUS      CHART             APP VERSION
3github-magnolia-docker    default      1           2020-11-18 07:42:32.240781604 +0000 UTC    deployed    magnolia-0.1.0    6.2.3
The output shows that we have deployed a github-magnolia-docker release in the cluster, using the magnolia-0.1.0 chart. The app version is 6.2.3.
To see more details about underlying objects we can use the kubectl command:
1$ kubectl get statefulset
2NAME READY AGE
3github-magnolia-docker-author 1/1 21h
4github-magnolia-docker-public 1/1 21h
5
6$ kubectl get pods
7NAME READY STATUS RESTARTS AGE
8github-magnolia-docker-author-0 1/1 Running 0 21h
9github-magnolia-docker-public-0 1/1 Running 0 21h
10
11$ kubectl get svc
12NAME TYPE CLUSTER-IP EXTERNAL-IP PORT(S) AGE
13github-magnolia-docker-author ClusterIP 10.110.231.225 <none> 80/TCP 21h
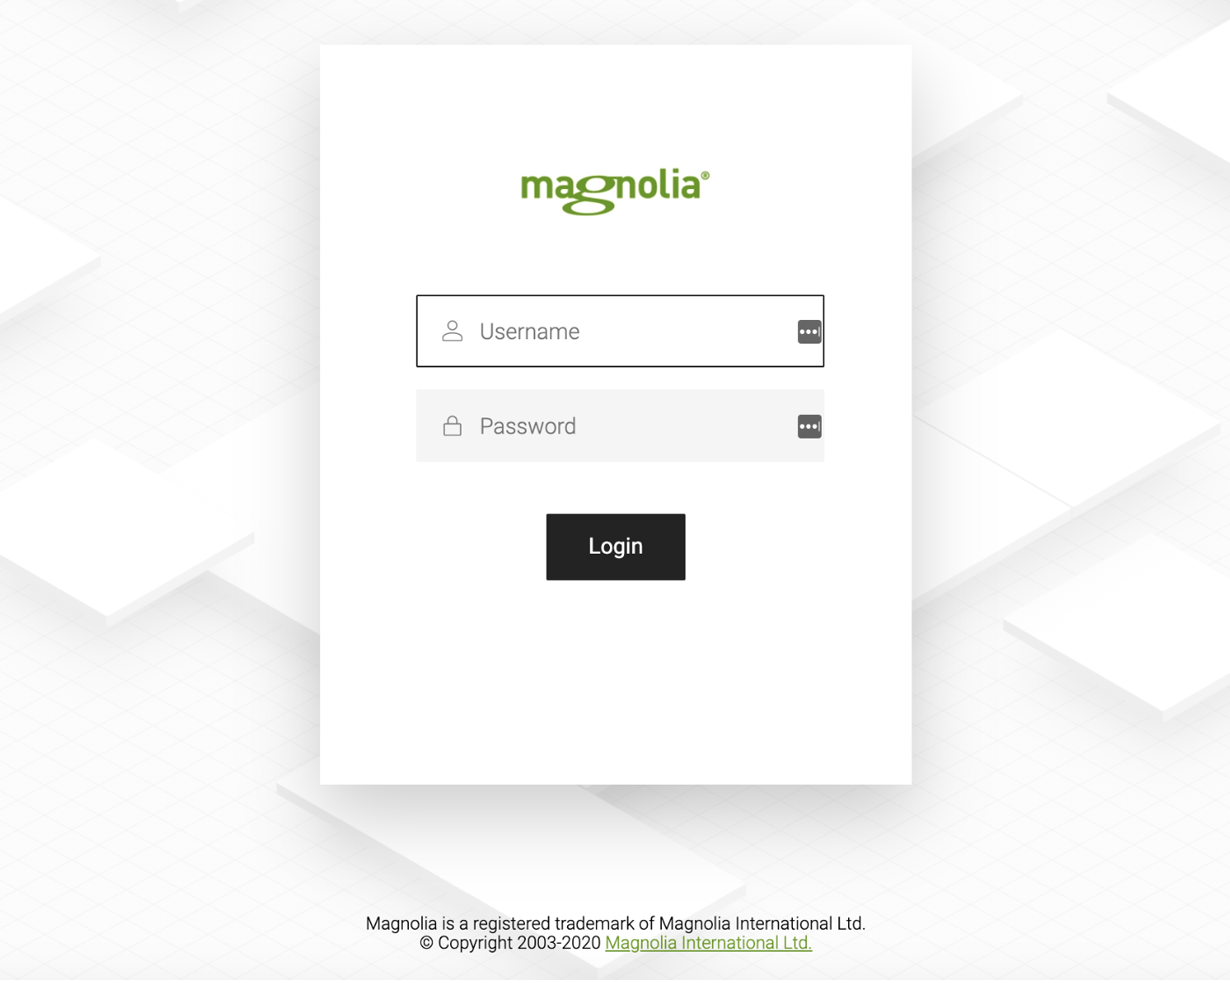
14github-magnolia-docker-public ClusterIP 10.98.85.7 <none> 80/TCP 21h You can use port forwarding to access your Magnolia services via localhost, for example, the Magnolia author service:
1$ kubectl port-forward svc/github-magnolia-docker-author 8888:80 Open http://localhost:8888 in a browser and log in with superuser/superuser.
Taking Magnolia’s Containerization to the Next Level
Containerizing Magnolia is cool, isn’t it? But that’s not the whole story. You can make it part of a CI/CD workflow that seamlessly integrates with GitHub and your Kubernetes cluster. CI/CD is an essential aspect of DevOps culture and vital to get right.
GitHub Actions proves to be an efficient and easy-to-use tool to make things work in reality. From here you can add more actions to the pipeline, like test steps, updating the bundle descriptor, or service definitions in the Helm chart.
For updates and contributions, take a look at our GitHub repository.