- Sep 1, 2021
- 9 min
Developing a Headless Vue.js Application with Magnolia
-
 Dominic NguyenSenior Software Developer, Magnolia

Magnolia in action
Take 12 minutes and a coffee break to discover how Magnolia can elevate your digital experience.
When developing digital experiences in a headless architecture, Magnolia offers a unique way for marketers to design pages visually in a WYSIWYG editor while templates and application logic are managed by a decoupled front-end, such as a SPA or PWA.
While it was already possible to use our visual editor with any front-end framework, it required more effort to make it work with anything but React and Angular. With Vue.js becoming one of the most popular JavaScript frameworks for developing front-end applications, we decided it was time to offer an even easier way to integrate Vue.js.
In this blog, I will introduce the vue-editor library and demonstrate how to create a Vue.js application that fetches pages from Magnolia via REST API.
Whenever you need help, you can refer to my code in the sample project.
Setting up a front-end project
Please make sure you’ve installed NodeJS from https://nodejs.org before you proceed.
You will use the Vue CLI to create a Vue project called magnolia-vue-site. Install it and when it asks for the Vue version, choose Vue 3.
1npm install -g @vue/cli
2vue create magnolia-vue-site
3cd magnolia-vue-site
Then install @magnolia/vue-editor as well as rimraf and copyfiles to help copy compiled code to a Magnolia Light Module.
1npm install @magnolia/vue-editor
2npm install -D rimraf copyfiles
After you create the project, you can use npm run serve to start the development server generated by the Vue CLI.
Configuring the Vue server port and REST URLs
The default ports for the Magnolia and Vue server are both 8080, so you need to change one of them.
For this tutorial, set the Vue port to 3000 and configure the publicPath and lintOnSave.
Create the vue.config.js in the root folder magnolia-vue-site:
1module.exports = {
2  devServer: {
3    port: 3000
4  },
5  publicPath: `${process.env.VUE_APP_MGNL_BASE}${process.env.VUE_APP_MGNL_STATIC}`,
6  lintOnSave: false
7};
publicPath tells Vue to append this path to links in index.html when generating the file. Setting lintOnSave to false means I don’t want the Vue IDE extension to check ESLint rules when I save a file.
The above also uses the parameters VUE_APP_MGNL_BASE and VUE_APP_MGNL_STATIC which come from the .env file.
So, let’s create .env in the root folder using the following parameters that are needed when generating index.html and making REST calls in the application:
1VUE_APP_MGNL_HOST=http://localhost:8080
2
3VUE_APP_MGNL_BASE=/magnoliaAuthor
4
5VUE_APP_MGNL_API_TEMPLATES=/.rest/template-annotations/v1
6VUE_APP_MGNL_API_PAGES=/.rest/delivery/pages/v1
7VUE_APP_MGNL_STATIC=/.resources/vue-gallery/webresources/dist
8VUE_APP_MGNL_GALLERY=/.rest/delivery/gallery/v1
Building the project
Add two scripts in the package.json file and modify the build script:
1"clean": "rimraf dist && rimraf light-modules/vue-gallery/webresources/dist",
2"deploy": "npm run build && copyfiles -u 1 \"dist/**/*\" light-modules/vue-gallery/webresources/dist"
3"build": "npm run clean && vue-cli-service build",
The clean script deletes compiled code from the dist and webresources folders and the deploy script builds and then copies the dist folder to the webresources folder.
Installing Magnolia
Please follow the documentation to install Magnolia. If you are not familiar with Light Development in Magnolia, I also recommend reading up on it before continuing to the next section.
Creating a Magnolia Light Module
Magnolia can be configured through YAML files in so-called "Light Modules". Create a light-modules folder in the root folder and a vue-gallery3 Light Module using the Magnolia CLI:
1mgnl create-light-module vue-gallery Creating a Content App
Next, create a ‘photo’ Content Type and the Content App:
1cd vue-gallery
2mgnl create-app photo
Edit the Content Type definition in /contentTypes/photo.yaml:
1# Automatically generated contentType demonstrates usage of the common properties.
2# Modify them to match your requirements.
3datasource:
4    workspace: gallery
5
6    # Optionally configure a custom namespace. (Replace [myNamespace] everywhere.)
7    # This namespace can then be used below for the nodetype.
8    namespaces:
9      mt: https://www.magnolia-cms.com/jcr/1.0/mt
10    autoCreate: true
11
12model:
13    # Optionally supply a specific nodetype, otherwise 'mgnl:content' will be used.
14    nodeType: mt:gallery
15    properties:
16    - name: title
17      label: Title
18      type: String
19      required: true
20      i18n: true
21
22    - name: description
23      label: Description
24      type: String
25
26    - name: image
27      label: Image
28      type: asset
Edit the Content App definition in /contentApps/photo.yaml:
1!content-type:photo
2name: Photos
When you login to Magnolia now, you should see the Photos App and can add data to the Photos App and Assets App to test the REST endpoints in the next step.
If you want to, you can import data from the content-import folder from my source code for the gallery endpoint.
Registering the REST endpoints
Register two REST endpoints, one is for pages and one for photos:
/restEnpoints/delivery/pages_v1.yaml
1class: info.magnolia.rest.delivery.jcr.v2.JcrDeliveryEndpointDefinition
2workspace: website
3nodeTypes:
4  - mgnl:page
5includeSystemProperties: true
6bypassWorkspaceAcls: true
7limit: 50
8depth: 10
9
10references:
11  - name: image
12    propertyName: image
13    referenceResolver:
14      class: info.magnolia.rest.reference.dam.AssetReferenceResolverDefinition
15      assetRenditions:
16        - '480'
17        - 1600x1200
/restEnpoints/delivery/gallery_v1.yaml
1class: info.magnolia.rest.delivery.jcr.v2.JcrDeliveryEndpointDefinition
2workspace: gallery
3nodeTypes:
4  - mt:gallery
5includeSystemProperties: true
6bypassWorkspaceAcls: true
7limit: 50
8depth: 10
9
10references:
11  - name: image
12    propertyName: image
13    referenceResolver:
14      class: info.magnolia.rest.reference.dam.AssetReferenceResolverDefinition
15      assetRenditions:
16        - '480'
17        - 1600x1200
Use the Definitions app to check if the new endpoints got registered in Magnolia:
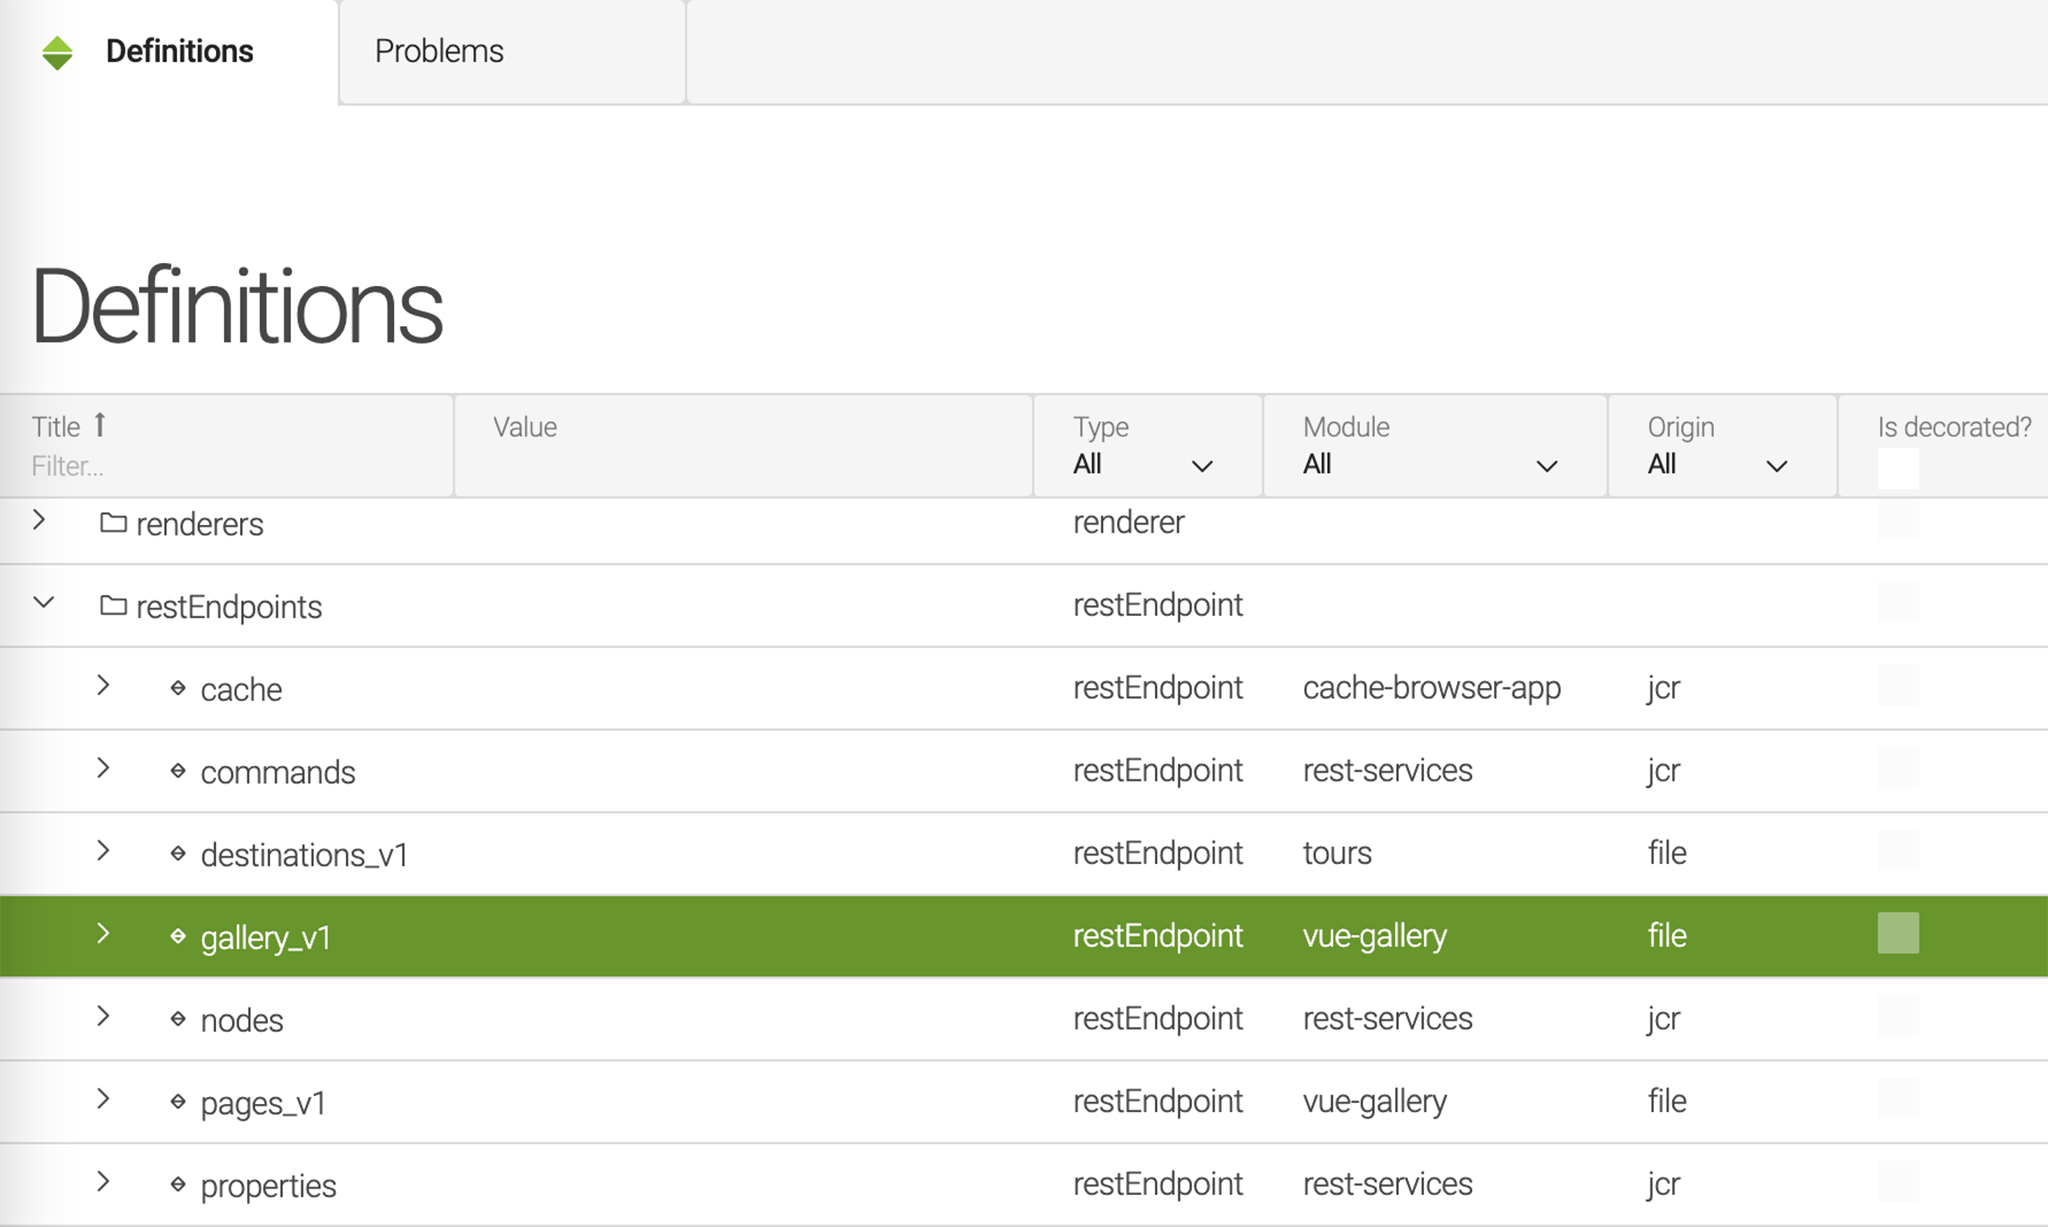
You can also check if the below URLs are working correctly:
Creating templates
Create a page template and three component templates. Check out our sample project for templates that you can use.
Create a page template in /templates/pages/standard.yaml:
1class: info.magnolia.rendering.spa.renderer.SpaRenderableDefinition
2renderType: spa
3visible: true
4dialog: mte:pages/pageProperties
5templateScript: /vue-gallery/webresources/dist/index.html
6
7areas:
8  header:
9    title: Header
10    type: single
11    availableComponents:
12      header:
13        id: vue-gallery:components/page-header
14  main:
15    renderType: spa
16    title: Main
17    availableComponents:
18      gallery:
19        id: vue-gallery:components/gallery
20  footer:
21    renderType: spa
22    title: Footer
23    type: single
24    availableComponents:
25      footer:
26        id: vue-gallery:components/page-footer
The three component definitions don’t have any content. Create three empty files, so Magnolia can register these components.
To keep it simple, we won’t create any dialogs.
Creating the Vue components
The Vue CLI has already created main.js, App.vue, and components/HelloWorld.vue for your.
Configuring the App.vue
In this tutorial, you will use a bootstrap template from https://getbootstrap.com/docs/5.0/examples/album/. Install bootstrap and import the bootstrap CSS:
1npm install bootstrap In the App.vue file, add the below lines:
1import "../node_modules/bootstrap/dist/css/bootstrap.css";
2import "../node_modules/bootstrap/dist/js/bootstrap.js";
Next, import EditablePage from @magnolia/vue-editor and edit the template.
1<template>
2 <editable-page
3   v-if="content && templateAnnotations"
4   :content="content"
5   :templateAnnotations="templateAnnotations"
6   :config="config"
7 />
8</template>
EditablePage required three parameters: content, templateAnnotations and config.
content is a page object that we need to fetch from the pages endpoint.
templateAnnotations is an object from the template annotation endpoint.
config is an object that has an attribute componentMappings that I will create later.
Below is the code to initialize parameters for the EditablePage:
1import "../node_modules/bootstrap/dist/css/bootstrap.css";
2import "../node_modules/bootstrap/dist/js/bootstrap.js";
3import { EditablePage } from '@magnolia/vue-editor';
4import componentMappings from './mappings';
5import config from './config';
6
7function removeExtension(path) {
8 let newPath = path;
9 if (path.indexOf('.') > -1) {
10   newPath = path.substr(0, path.lastIndexOf('.'));
11 }
12 return newPath;
13}
14
15export default {
16 name: "App",
17 components: {
18   EditablePage
19 },
20 data() {
21   return {
22     content: null,
23     templateAnnotations: null,
24     config: {
25       componentMappings
26     }
27   };
28 },
29 methods: {
30   async loadPage() {
31     const { pathname } = window.location;
32     const path = config.BASE ? pathname.substr(config.BASE.length) : pathname;
33     const url = `${config.HOST}${config.BASE}${config.PAGES}${removeExtension(path)}`;
34     const pageRes = await fetch(url);
35     const data = await pageRes.json();
36     this.content = data;
37
38     const annotationUrl = `${config.HOST}${config.BASE}${config.ANNOTATIONS}${removeExtension(path)}`;
39     const annotationRes = await fetch(annotationUrl);
40     const annotationData = await annotationRes.json();
41     this.templateAnnotations = annotationData;
42   }
43 },
44 mounted() {
45   this.loadPage();
46 }
47};
loadPage must be called after mounted because vue-editor only works after Vue rendered the HTML in the document.
You also need to configure the permissions to call the template annotations endpoint. Check the documentation for the default configuration.
Creating the configuration object
In the App.vue component, use a config object that stores parameters to generate URLs for fetching data from REST endpoints.
Create /config.js:
1const HOST = process.env.VUE_APP_MGNL_HOST || 'http://localhost:8080';
2const BASE = process.env.VUE_APP_MGNL_BASE || '/magnoliaAuthor';
3const ANNOTATIONS = process.env.VUE_APP_MGNL_API_TEMPLATES || '/.rest/template-annotations/v1';
4const PAGES = process.env.VUE_APP_MGNL_API_PAGES || '/.rest/delivery/pages/v1';
5const GALLERY = process.env.VUE_APP_MGNL_GALLERY || '/.rest/gallery/gallery/v1';
6
7export default {
8 HOST,
9 BASE,
10 ANNOTATIONS,
11 PAGES,
12 GALLERY
13};
Creating a page component to display the standard page template
The App.vue is now ready, so create a page component using the header, main, and footer parameters from EditablePage.
The EditablePage renders a page component dynamically and passes all areas from the template definition to the dynamic page component.
Create StandardPage.vue in the src/components folder:
1<template>
2 <header>
3   <editable-area :content="header"></editable-area>
4 </header>
5 <main>
6   <section class="py-5 text-center container">
7     <div class="row py-lg-5">
8       <div class="col-lg-6 col-md-8 mx-auto">
9         <h1 class="fw-light">Album example</h1>
10         <p class="lead text-muted">
11           Something short and leading about the collection below—its contents,
12           the creator, etc. Make it short and sweet, but not too short so
13           folks don’t simply skip over it entirely.
14         </p>
15         <p>
16           <a
17             href="https://getbootstrap.com/docs/5.0/examples/album/#"
18             class="btn btn-primary my-2"
19             >Main call to action</a
20           >
21           <a
22             href="https://getbootstrap.com/docs/5.0/examples/album/#"
23             class="btn btn-secondary my-2"
24             >Secondary action</a
25           >
26         </p>
27       </div>
28     </div>
29   </section>
30
31   <div class="album py-5 bg-light">
32     <editable-area :content="main"></editable-area>
33   </div>
34 </main>
35 <editable-area :content="footer"></editable-area>
36</template>
37
38<script>
39import { EditableArea } from '@magnolia/vue-editor';
40
41export default {
42 name: 'StandardPage',
43 components: { EditableArea },
44 props: ['header', 'main', 'footer']
45};
46</script>
The StandardPage imports EditableArea from @magnolia/vue-editor and has three properties: header, main and footer. The template specifies each area in the page layout.
Creating component mappings
Now, create the component mappings that map the StandardPage component to the page template ID in src/mappings.js:
1import StandardPage from './components/StandardPage.vue';
2export default {
3 'vue-gallery:pages/standard': StandardPage
4};
Run npm run deploy and check the result in Magnolia.

Creating the card component
Create a card component in src/components/Card.vue with a photo property that you can pass a photo object to:
1<template>
2 <div class="card shadow-sm">
3   <svg
4     class="bd-placeholder-img card-img-top"
5     width="100%"
6     height="280"
7     xmlns="http://www.w3.org/2000/svg"
8     role="img"
9     aria-label="Placeholder: Thumbnail"
10     preserveAspectRatio="xMidYMid slice"
11     focusable="false"
12   >
13     <title>Placeholder</title>
14     <rect width="100%" height="100%" fill="#55595c"></rect>
15     <text x="50%" y="50%" fill="#eceeef" dy=".3em">Thumbnail</text>
16     <image :href="hostname + photo.image.renditions['480'].link" width="100%" height="100%" ></image>
17   </svg>
18
19   <div class="card-body">
20     <p class="card-text">
21       This is a wider card with supporting text below as a natural lead-in to
22       additional content. This content is a little bit longer.
23     </p>
24   </div>
25 </div>
26</template>
27
28<script>
29import config from '../config';
30
31export default {
32 name: 'Card',
33 props: ['photo'],
34 setup() {
35   return {
36     hostname: config.HOST
37   }
38 }
39};
40</script>
Creating the gallery component
Next, create a gallery component in src/components/Gallery.vue to fetch photos from the gallery endpoint:
1<template>
2 <div class="container">
3       <div class="row row-cols-1 row-cols-sm-2 row-cols-md-3 g-3">
4         <div class="col" v-for="photo in photos" :key="photo['@id']">
5           <card :photo="photo"></card>
6         </div>
7       </div>
8     </div>
9</template>
10
11<script>
12import Card from './Card.vue'
13import config from '../config';
14export default {
15 name: 'Gallery',
16 data() {
17   return {
18     photos: []
19   }
20 },
21 components: { Card },
22 methods: {
23   async loadData() {
24     const url = `${config.HOST}${config.BASE}${config.GALLERY}`;
25     const res = await fetch(url);
26     const data = await res.json();
27     this.photos = data.results;
28   }
29 },
30 beforeMount() {
31   this.loadData();
32 }
33}
34</script>
You also have to create the HTML tags PageHeader and PageFooter. You can find the code in my project’s source. Note that I added a page prefix to avoid a conflict.
Then, map Gallery, PageHeader and PageFooter to mappings.js:
1import StandardPage from './components/StandardPage.vue';
2import Gallery from './components/Gallery.vue';
3import PageHeader from './components/PageHeader.vue';
4import PageFooter from './components/PageFooter.vue';
5
6export default {
7 'vue-gallery:pages/standard': StandardPage,
8 'vue-gallery:components/gallery': Gallery,
9 'vue-gallery:components/page-header': PageHeader,
10 'vue-gallery:components/page-footer': PageFooter
11};
You’ve now completed this tutorial and can customize your Vue templates to your needs.
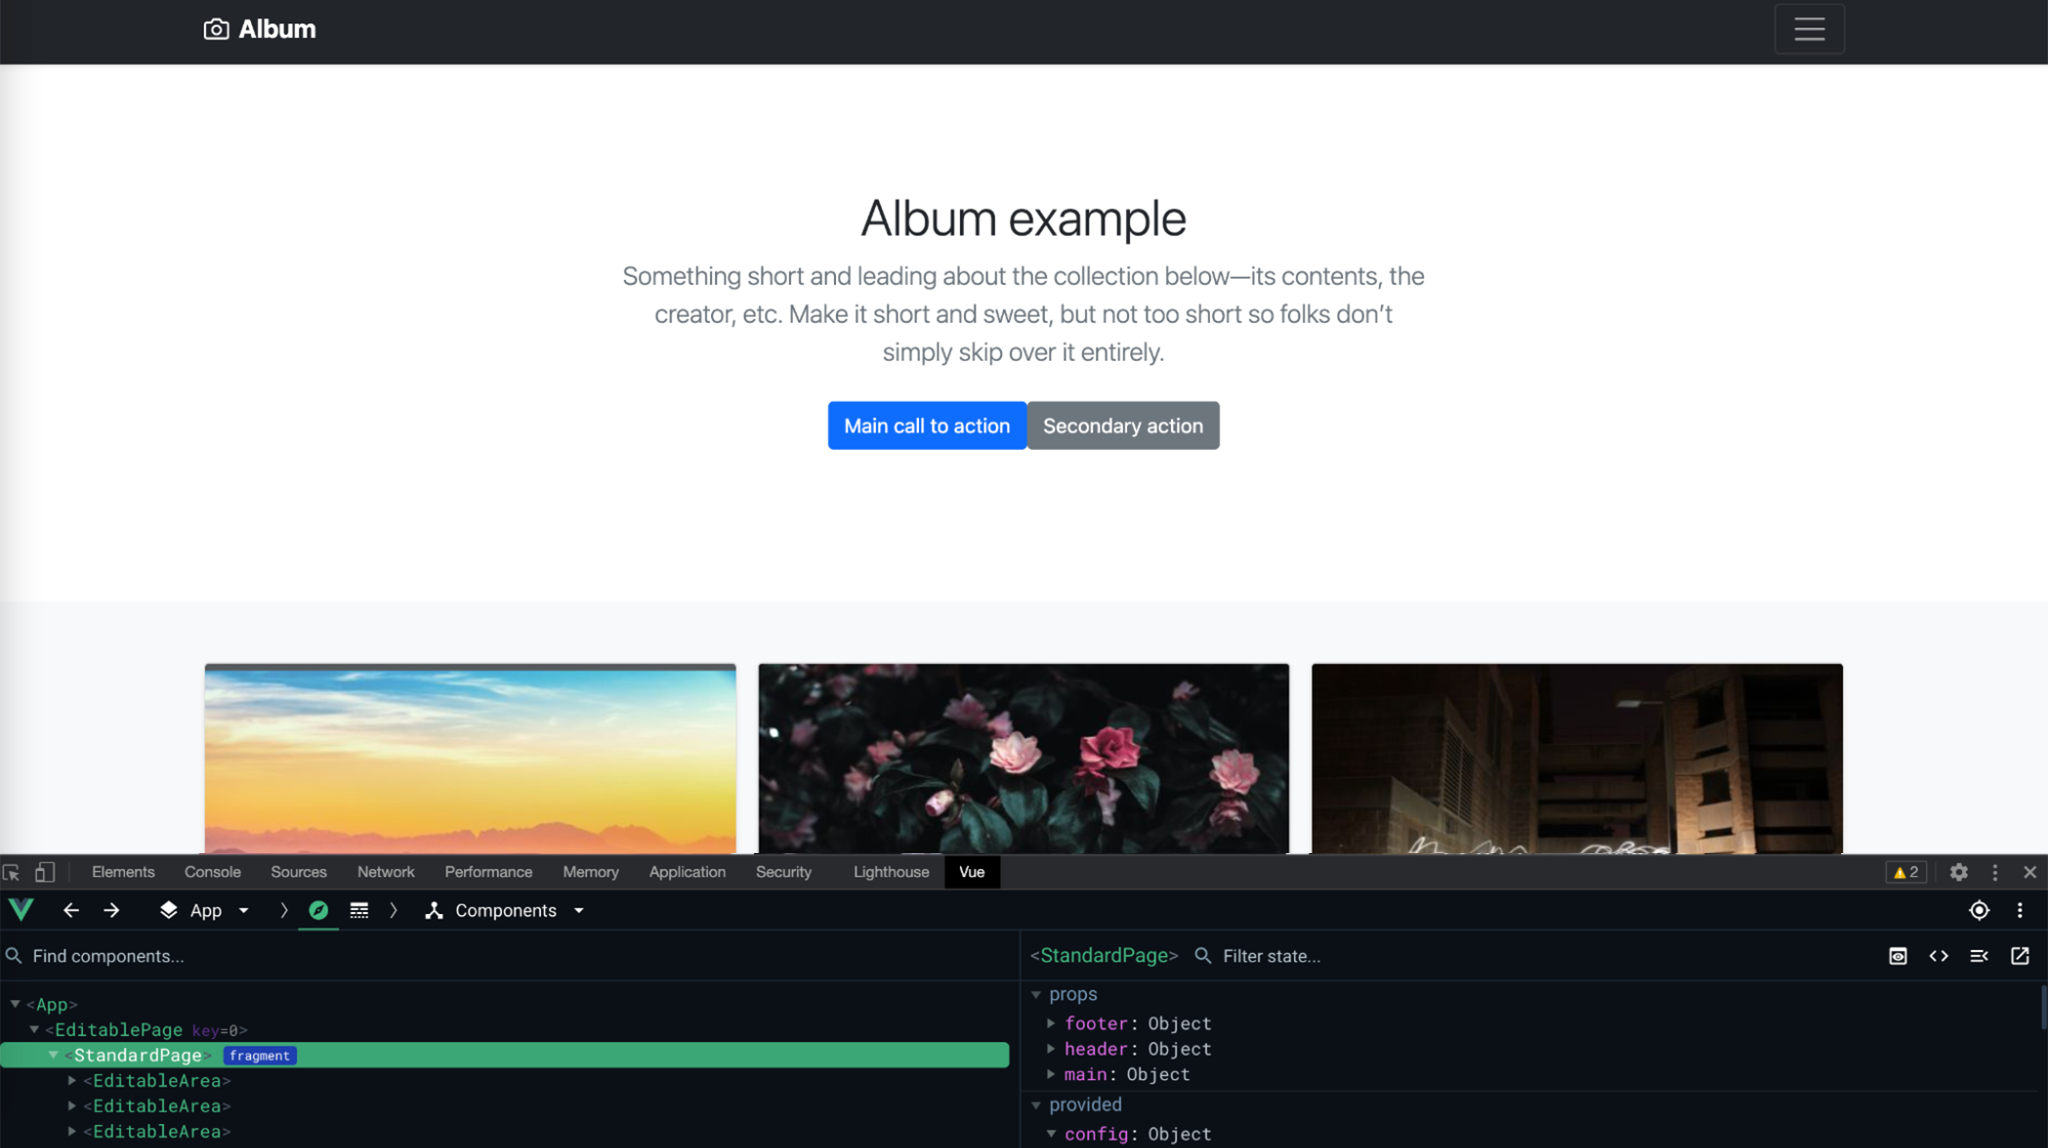
Screenshots from the project
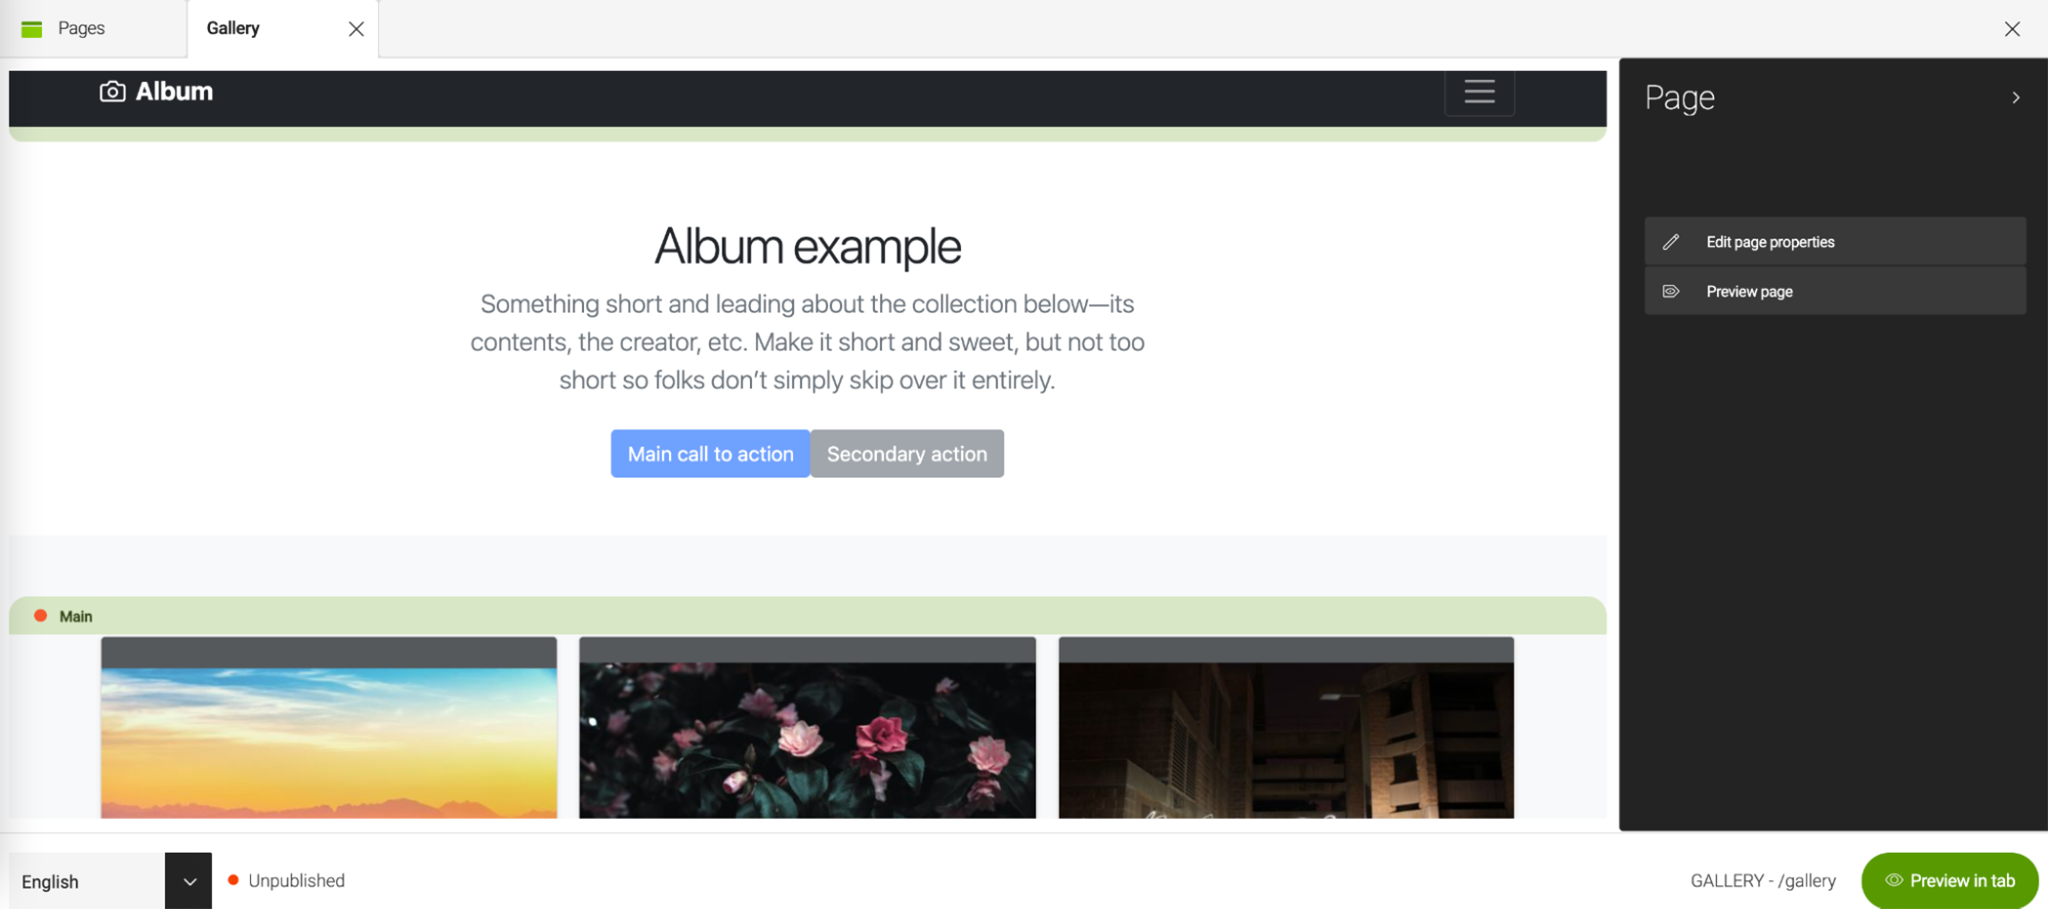
The gallery page in edit mode
The gallery page that is hosted in Magnolia
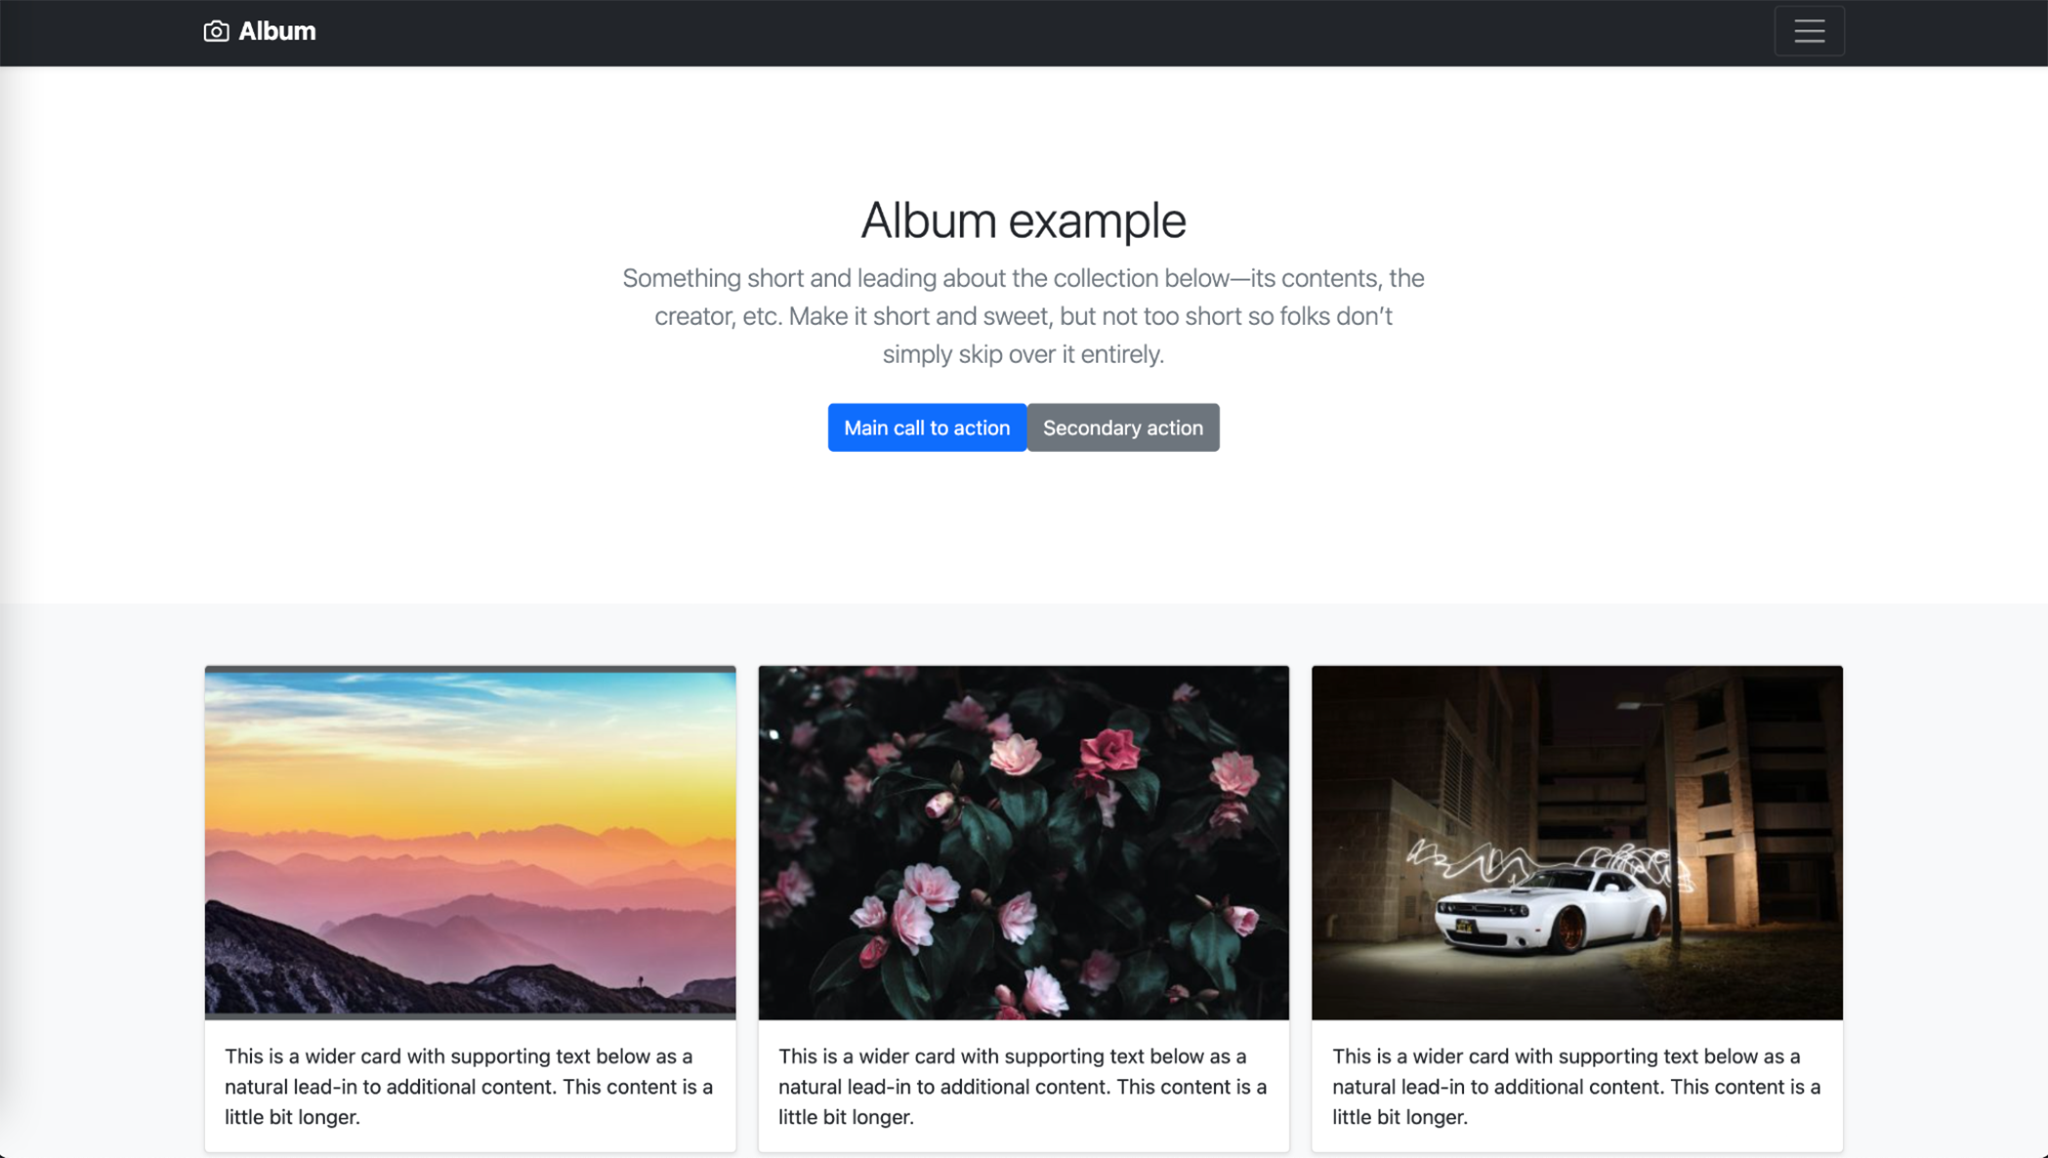
The gallery page on dev server (npm run serve)
Resources
You can find the project source code below:
We also have another sample project that you may be interested in:
If you’re not familiar with Magnolia Light Modules or the Pages Editor, you can check out these resources: